Friday, February 28, 2014

Product Reviews, The FTC and Bloggers


Yesterday, the Federal Trade Commission published their "Final Guides Governing Endorsements, Testimonials" in an article subtitled "Changes Affect Testimonial Advertisements, Bloggers, Celebrity Endorsements".


According to the FTC web site posting;


"The notice incorporates several changes to the FTC's Guides Concerning the Use of Endorsements and Testimonials in Advertising, which address endorsements by consumers, experts, organizations, and celebrities, as well as the disclosure of important connections between advertisers and endorsers."


Furthermore it states;


"The revised Guides specify that while decisions will be reached on a case-by-case basis, the post of a blogger who receives cash or in-kind payment to review a product is considered an endorsement. Thus, bloggers who make an endorsement must disclose the material connections they share with the seller of the product or service."


"Under the revised Guides, advertisements that feature a consumer and convey his or her experience with a product or service as typical when that is not the case will be required to clearly disclose the results that consumers can generally expect."


And if that weren't enough, the post goes on to clearly state;


"While the 1980 Guides did not explicitly state that endorsers as well as advertisers could be liable under the FTC Act for statements they make in an endorsement, the revised Guides reflect Commission case law and clearly state that both advertisers and endorsers may be liable for false or unsubstantiated claims made in an endorsement - or for failure to disclose material connections between the advertiser and endorsers."


Under these regulations the article I posted earlier this morning could be considered a testimonial for Gitzo and my claims that the Gitzo Traveller tripod "has seen the extremes of heat, humidity, mud, sand, gravel and just plain dirt and they work as well now as the first day I bought them" could be considered "unsubstantiated" and I would be legally "liable" if one of my readers were to purchase the same tripod due to my testimonial and have a different experience with it than I had. The reader could then file suit and attempt to recover damages from me.


Here's the "material connection" they talk about. I paid for the product, used the product and wrote about the product. I didn't get it "free" or accept any remuneration from Gitzo, but I am a "consumer" of the product and did write a product review advocating the use of the product. How about the "unsubstantiated" part? How do I substantiate my claims that the product has seen the extremes of heat, humidity, etc. and worked just fine? Do I have to video tape my use of every product I review on this blog?


In my opinion, the effect of these revised regulations will be to stifle the frank and honest review of new products by bloggers and forum posters throughout the United States. No longer will bloggers or forum posters be able to openly discuss their "opinion" on the merits of a new product without fear of reprisal. I can envision the day in the very near future that Canon releases a new DSLR camera and no one "dares" to post a preview, review or flame about it's features or perceived benefits for fear of being sued.


  • Will folks living in "the land of the free and the home of the brave" have to read products reviews from foreign authors only?
  • Do these revised regulations really help protect consumers and does the Government really think consumers are that gullible?
  • Are the opinions of bloggers so controversial that we require FTC regulation?
  • Is this what Freedom of Speech has come to in our country?

Posted in Photography Tagged: Bloggers, Federal Trade Commission, FTC Endorsement Guidelines


Landscape Photography – Fixing Exposure in Post


"Do I really need to use all these filters for my landscape shots or can I just fix them in post?"


Believe it or not, this question has been around about as long as photography has. In the days of black & white film and "wet" printing, photographers spend hours and hours "dodging and burning" their enlargements to compensate for areas of different exposure values. It was an art form at its very best. Photographers would create all sorts of dodging and burning "tools" to assist in this process and the end result could be spectacular (Ansel Adams) or just plain crap! Today we have Lightroom and Photoshop and the opportunities to "fix" an image during post-capture processing are almost limitless.


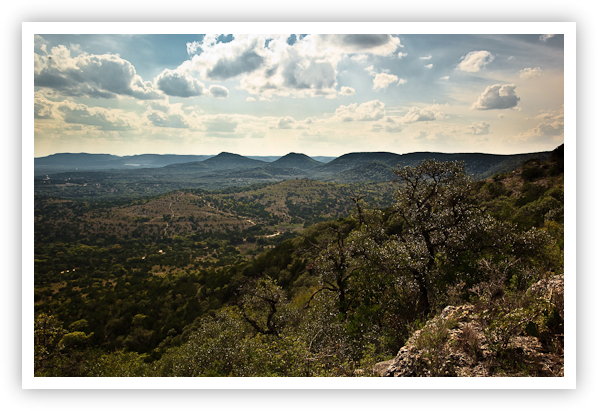
Flag Mountain View


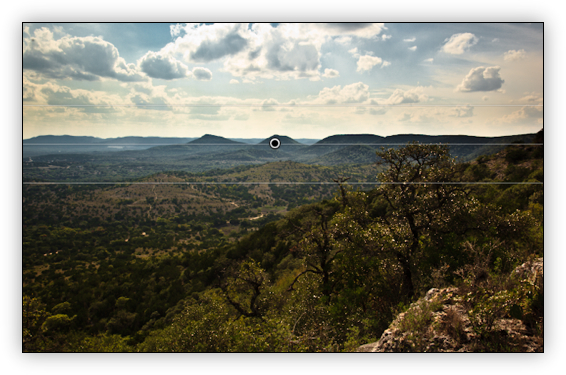
Flag Mountain View near Bandera, Texas
Copyright 2009 Jeff Lynch Photography
Shot taken with a Canon EOS 5D Mark II set on aperture priority (Av) using an EF 24-105mm f/4L IS USM lens hand held. The exposure was taken at 32mm, f/11 for 1/50th of a second using a Singh-Ray LB Warming Polarizer at ISO 100 on Lexar Professional digital film. Post capture processing was done in Adobe Lightroom 2. Click on the image above for a larger version.


Take this image for example. I shot this a few weeks ago while hiking in central Texas. The light was pretty poor in the late afternoon sun and I hadn't brought a graduated ND filter with me as I usually do. All I had was a circular polarizer to help cut down the haze and harsh reflections off the leaves. The scene was really breathtaking and I was disappointed that I hadn't brought the right gear to capture it properly.


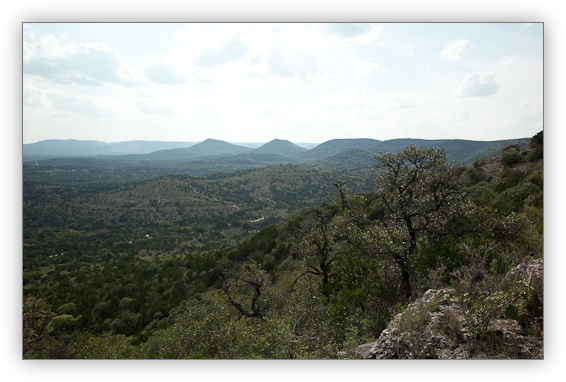
Flag Mountain View (Original)


Original RAW Image


Rather than give up I setup my tripod and adjusted the Singh-Ray LB Warming Polarizer to provide the maximum amount of polarization. As you can see in the image above, it did help to reduce the glare but the difference in exposure values for the foreground and the sky was at least 3 stops. I took a few shots using the histogram on the camera's LCD to judge my exposure. I had no "blinkies" (blown highlights) so I new I had an exposure I could work with.


My first step in developing this RAW image was to process it as I would normally do in Lightroom. I generally work on the Basic settings like Exposure, Recovery (very important), Blacks (also very important), Brightness and overall Contrast. I almost always crank up the Clarity (adding mid-tone contrast) and Vibrance (adding mid-tone saturation) and may play with these two settings for 20 or 30 minutes until I find a combination I like.


fm01


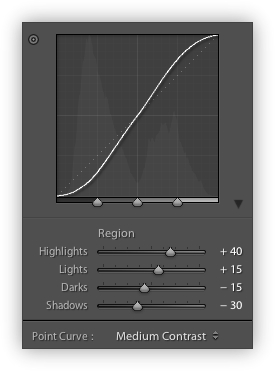
Tone Curve Adjustments


My next step was to work with the Tone Curve to adjust the Highlights and Shadows, and the Lights and Darks in the image adding much needed contrast and separation to these areas.


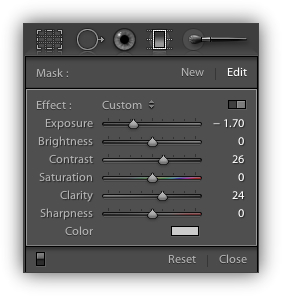
Using Lightroom's Gradient Tool


Using Lightroom's Gradient Tool


My final step was to use Lightroom's Gradient tool to simulate the effect of using a 2-stop graduated neutral density filter as shown above. While this tool is not nearly as effective as using a real ND-Grad in the field, it does offer very granular control over other characteristics in the gradient such as Exposure, Contrast and Clarity.


Using the Gradient Tool as a Graduated Neutral Density Filter


Using the Gradient Tool as a Graduated Neutral Density Filter


All in all, this image took about 45 minutes to "develop" in Lightroom and while the results are acceptable considering the original image, the amount of time spent working on this was considerable. If I'd used a graduated neutral density filter during the original exposure my post capture workflow would have taken only a few minutes and I really believe the results would have been much better.


In my opinion, making the exposure "in camera" is what photography is all about! Think of it this way; have you ever been out in the field photographing nature and thought to yourself, "I sure wish I was back home working on my images in Lightroom rather than out here with my camera"? Me neither!


Posted in Photography Tagged: Canon, Canon 5D Mark II, Hill Country State Natural Area, Landscape Photography, Photography, Texas Landscapes


Thursday, February 27, 2014

Workshop Preparation – Camera Support Systems


Jeff,
What ballhead is in that photo? (or is that for tomorrow's post?)
Thanks.
Andy


If you've read my previous post, then you understand that high quality tripods are sold "bare", without anyhting to attach them to your camera. This is where the ballhead and clamp come in. Good quality ballheads are designed to support heavy loads, move smoothly but lock solidly. Ballheads are easier to use and much more stable than the old fashioned "pan & tilt" tripod heads. Aiming and leveling can be accomplished as one motion, and solid lockup is accomplished with a tightening of only one control. The best designed ballheads also offer variable tension that makes them easy to control. Tripods with ballheads are much easier to pack and carry than pan & tilt heads since they have no long handles to get in the way.


Ball_Head_Blog


But the ballhead is only half the story. The other half is the clamp system which is used to attach your camera to the ballhead. Mounting your camera using the standard " 20 screw is far too slow and insecure. Instead, many manufacturers adopted the "Arca-Swiss" standard which uses an open-ended dovetail channel with compressing side jaws that grip the mounting plate or bracket attached to the camera. This unique setup provides a quick and easy clamping system that is very solid and secure.


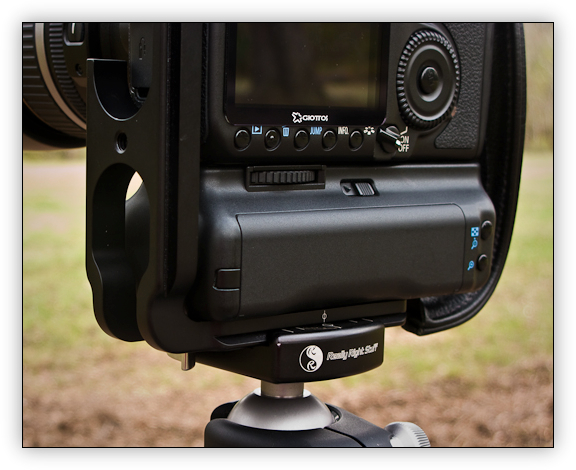
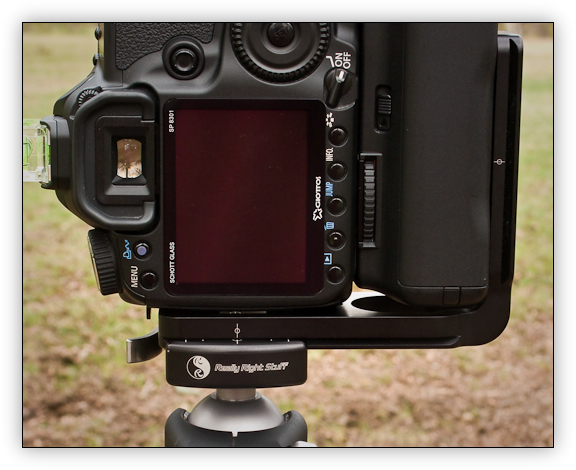
When used in conjunction with an L-Plate designed for your specific camera the quick-release clamp system allows the landscape photographer to quickly switch between shooting horizontally and vertically as shown in the images below.


Quick Release Clamp & Camera L-Plate


Quick Release Clamp with L-Plate


Really Right Stuff
In my opinion the best design and highest quality ballheads, clamps and camera plates are made by Really Right Stuff, a great little company in California owned and operated by Joe Johnson. The folks at RRS are incredible to work with and their attention to detail in the design and manufacturing of camera support systems is second to none. That's why you'll see nine out of ten professionals using RRS gear including guys like Joe McNally, Moose Peterson and Scott Kelby.


The advice I give to any serious amateur is to buy the best tripod and ballhead you can possibly afford and buy them only once. Really Right Stuff (gotta love that name) gear is expensive folks but worth every single penny. The workmanship is something I've only seen in medical devices before and the various parts fit together perfectly, time after time.


I've put an RRS L-Plate on every camera I currently shoot with from my 5D mark II to my G10 and can lock them into my BH-40 LR / Gitzo Traveller in just seconds to capture that perfect light at the end of the day. I honestly can't imagine using any other brand than Really Right Stuff.


Posted in Photography Tagged: Camera Support Systems, Landscape Photography, Photography, Really Right Stuff


Landscape Photography – Green and Gold


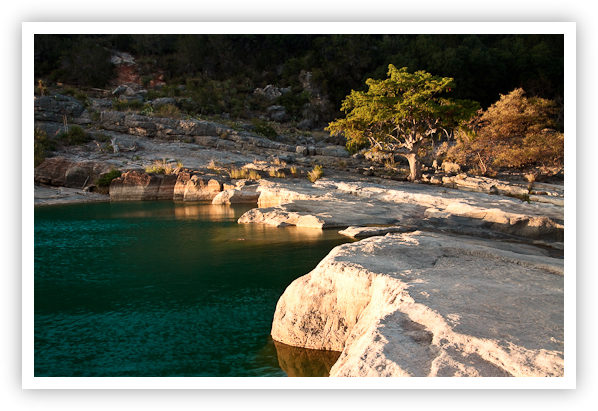
Pedernales Falls State Park near Johnson City, Texas is one of the most picturesque spots in the Hill Country. The elevation of the Pedernales river drops about 50 feet over a distance of less than 1/2 mile, and the cascading falls are formed by the flow of water over the uplifted limestone layers. The falls are extremely dynamic and never look exactly the same two days in a row, especially during the rainy season. This is one location every Texas landscape photographer should visit again and again.


Wildlife in the park is typical of the Hill Country and includes deer, coyotes, rabbits, armadillos, opossums, and raccoons. According to the folks at Texas Parks & Wildlife, "over 150 species of birds have been seen in the park" including ravens, vultures, herons, quail, doves, owls, roadrunners, wild turkeys as well as sparrows and western scrub jays.


I'll be perfectly honest here folks, every time I venture out to explore the falls, a flock of turkey vultures are usually circling overhead just waiting for me to drop. The only other wildlife I've seen were a pair of Texas A&M coeds on the prowl. Pretty scary at that!


Green and Gold


Green & Gold at Pedernales Falls, Texas
Copyright 2009 Jeff Lynch Photography
Shot taken with a Canon EOS 50D set on aperture priority (Av) using an EF 24-105mm f/4L IS USM lens tripod-mounted. The exposure was taken at 28mm, f/13 for 1/6th of a second using a Singh-Ray LB Warming Polarizer at ISO 100 on Lexar Professional digital film. Post capture processing was done in Adobe Lightroom 2. Click on the image above for a larger version.


Posted in Photography Tagged: Canon, Canon 50D, Landscape Photography, Photography, Texas Landscapes


Wednesday, February 26, 2014

Architecture Photography by Richard Barnes


Richard Barnes 650x433 Architecture Photography by Richard Barnes


Work by New York-based Photographer Richard Barnes has been shown in solo exhibitions at such institutions as the Museum of Photographic Arts in San Diego, the Carnegie Museum of Art in Pittsburgh, the Carpenter Center at Harvard University, Cranbrook Academy of Art Museum, and the University of Michigan Art Museum.

Richard Barnes3 650x458 Architecture Photography by Richard Barnes


Richard Barnes5 650x425 Architecture Photography by Richard Barnes


Richard Barnes7 650x461 Architecture Photography by Richard Barnes


Richard Barnes9 650x443 Architecture Photography by Richard Barnes


via Photography Blog.


Leawo Total Media Converter - Enjoy Spring Offer up to 50% Off!


Celebrate Dinosaur Day. Collection from Wallsheaven


e493d165d3 650x390 Celebrate Dinosaur Day. Collection from Wallsheaven


The largest of them had 12 feet tall and weigh up to 60 tons! Formerly, huge reptiles inhabited our planet and today we see them only in cartoons and comics. In a few days untypical holiday - Global Dinosaur Day.

On this occasion Wallsheaven.com has prepared a design collection of wall murals inspired by the legendary giants.


112cbd3629 650x390 Celebrate Dinosaur Day. Collection from Wallsheaven


c0e779dcf6 650x390 Celebrate Dinosaur Day. Collection from Wallsheaven


Dinosaur at home? Yes, it sounds weird. Unless we mean a dinosaur in a child's room. Big reptiles became extinct for over 65 million years ago, but now came back. Straight into our homes.


81726b2d53 650x390 Celebrate Dinosaur Day. Collection from Wallsheaven


3717ea01fe 650x390 Celebrate Dinosaur Day. Collection from Wallsheaven


c57295262f 650x390 Celebrate Dinosaur Day. Collection from Wallsheaven


Dinosaur Day is celebrated on February 26. Nobody knows who and why created this holiday. But many schools decided to use it and on this day reminds young people the history of prehistoric animals.


3de43d1bef 650x550 Celebrate Dinosaur Day. Collection from Wallsheaven


One theory is that the dinosaurs became extinct from hitting the big asteroid that fell near present-day Yucatan in Mexico. However, this theory has never been confirmed.


4d2700de1a 650x414 Celebrate Dinosaur Day. Collection from Wallsheaven


0da942c85e 650x390 Celebrate Dinosaur Day. Collection from Wallsheaven


42f4fb3a15 650x433 Celebrate Dinosaur Day. Collection from Wallsheaven


Dinosaurs accompany us since the birth of pop culture. Many of us certainly remember favorite fairy tales from childhood, such as "Denver The Last Dinosaur" or "Diplodo". On the one hand it may seem strange that we publish on design portal song with dinosaurs. But on the other hand, it's just their holiday ;)


Listen to the "Dino Song":


The whole collection "Pssss... Dino Is Here"" you can find HERE.


Leawo Total Media Converter - Enjoy Spring Offer up to 50% Off!