
London-based firm Gold & Co. have released the world's first 24 carat gold plated Gold Sony Xperia Z in Dubai , their first-ever Android-powered device. More pics and info here.

London-based illustrator, Neil Stevens' Don't Forget the Cassette series started with an idea to fill his loft studio wall space, and got him thinking about how the crude, simple typography and block colours of cassette inlay designs would look great on a wall.


Read more...


http://cargocollective.com/beatricecalastrini
http://flowerswork.tumblr.com/
I am pleased to get in touch with you here and let me start by introducing our company to you.
Our company specializes in Web Design (Responsive website design ), Graphic Design and Print design. We are devoted to providing service to clients all over the world.
Feel free to contact me if you have any needs from us.
You can visit our website here: http://www.cgchimp.com
More portfolio here: http://www.behance.net/cgchimp
Like us on Facebook! http://www.facebook.com/cgchimp
Follow us on Twitter! http://twitter.com/cgchimp
Our work -


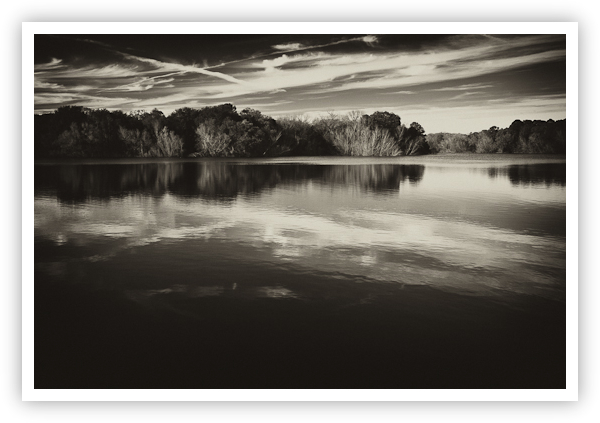
Reflections from Below – Smithville, Texas
Copyright 2009 Jeff Lynch Photography
Shot taken with a Canon EOS 5D Mark II set on manual (M) using an EF 24-105mm f/4L IS USM lens tripod-mounted. The exposure was taken at 32mm, f/13 for 1/13th of a second at ISO 100 using a Singh-Ray LB warming polarizer. Post capture processing was done in Adobe’s Lightroom 3 Beta and Nik Software’s Silver Efex Pro. Click on the image above for a larger version.
How to Get this Type of Shot: A landscape image of a perfectly calm lake and shoreline reflecting the late afternoon sky, converted to an “old fashioned” looking duo-tone.
![]()

I’ve always loved Canon’s telephoto zoom lenses in the “70-200mm” range and shot extensively with an old FD 70-210mm on my F-1N body in the days before digital. The EF 70-200mm lenses are both extremely sharp throughout their zoom range as you can see below in the MTF charts. I’d have loved to have evaluated the f/2.8L version of this lens but the price and size/weight convinced me to stick with the f/4 version. I finally settled on the newer, image stabilized lens so I could use it for landscape and commercial (hand-held) work.
I’ve got to say that this is one impressive lens. The size and weight are just about perfect for my 5D2 body and using the “Tripod Mounting Ring A II” the combination balances effortlessly on my Gitzo tripod. This is probably the sharpest Canon zoom I’ve ever shot with and the extra “reach” really helps cover those shots I was missing before.
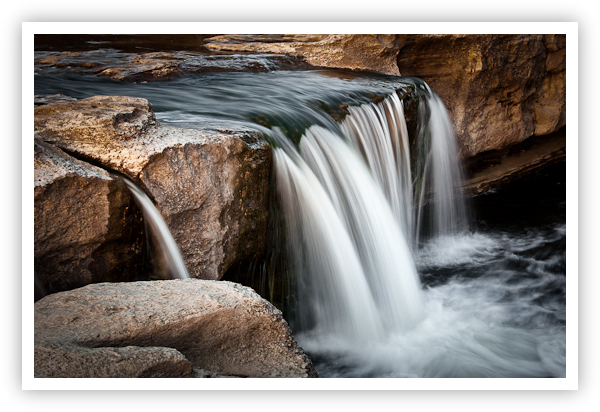
Lower McKinney Falls – Austin, Texas
Copyright 2009 Jeff Lynch Photography
Shot taken with a Canon EOS 5D Mark II set on manual (M) using an EF 70-200mm f/4L IS USM lens tripod-mounted. The exposure was taken at 85mm, f/20 for 0.4 seconds at ISO 100. All post capture processing was done in Adobe’s Lightroom 3 Beta. Click on the image above for a larger version.
No lens is perfect but this little beauty is close. My only gripes are that the image stabilization system is somewhat loud compared to my EF 24-105mm f/4L IS USM and my EF 300mm f/4L IS USM lenses and that the ET-74 lens hood is very narrow and deep. This makes adjusting a CP filter a bit of a pain when shooting.
And finally, the price difference between the “IS” version and “non-IS” version is just plain wrong ($1135 versus $589). The two lenses are optically very similar and I just can’t imagine that adding image stabilization could double the price. I suspect that Canon has been selling the “non-IS” version at too low a price for many years now and is trying to make up some of the profit on the “IS” version.
Other than that, Canon’s EF 70-200mm f4L lenses are absolutely superb in terms of sharpness, size/weight and value (especially the non-IS version at less than $600 USD) and I highly recommend either of these two lenses for landscape, portrait or commercial photography. You won’t be disappointed.
![]()
Today’s DSLR cameras offer incredible image size (pixel density) and quality allowing digital photographers to bring back the lost art of post-capture cropping. Don't get me wrong. Every photographer tries their best to compose in the viewfinder and today's DSLR cameras with "Live View" make this much easier than in the past. Cropping in the darkroom during enlargement was always a difficult proposition but with 10 to 25 million pixels to work with, almost any image can be cropped for dramatic effect today.
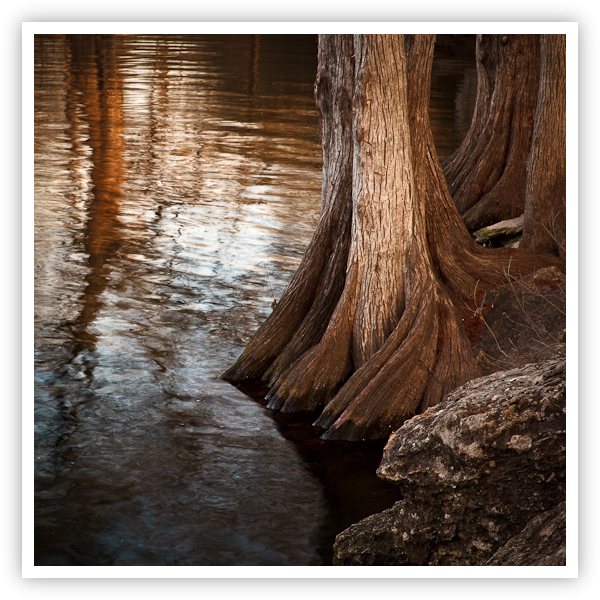
Cypress Reflections – Austin, Texas
Copyright 2009 Jeff Lynch Photography
Shot taken with a Canon EOS 5D Mark II set on manual (M) using an EF 24-105mm f/4L IS USM lens tripod-mounted. The exposure was taken at 102mm, f/16 for .3 seconds at ISO 100 using a Singh-Ray LB warming polarizer. All post capture processing was done in Adobe’s Lightroom 3 Beta. Click on the image above for a larger version.
I took this shot last month with the idea that I could use it to illustrate how cropping your images can help focus your viewer’s attention. In Adobe Lightroom it’s very simple to crop your image using any number of different “Crop Guide Overlays” found under the “Tools” menu. When I composed this image in my viewfinder I was looking to capture the beautiful texture of the cypress trees and their reflections in the slow moving river.
I wanted to “lead” the viewers’ eyes into the image using the rocks in the foreground at camera right and then have them explore the beautifully textured Cypress trees before moving to the reflections in the slowly moving water.
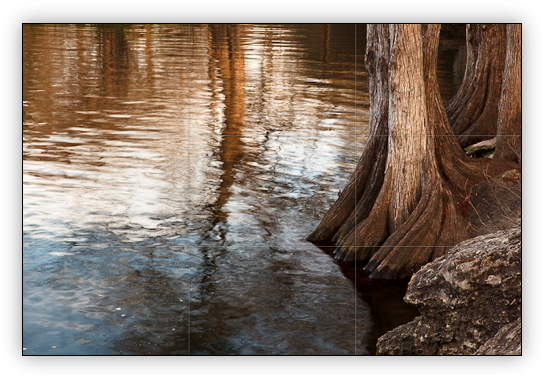
As you can see in the original image with it’s default 2 x 3 aspect ratio crop, there was a lot of empty space on the far left that I thought would allow the viewer’s eye to wander out of the image. To correct this I needed to select an alternate aspect ratio to cut off some this empty space.
The first crop I tried was a more typical 5 x 7 landscape aspect ratio (shown above) that eliminated about 25% of the problem. Not a bad start but still a long way to go before the image “felt” balanced to me.

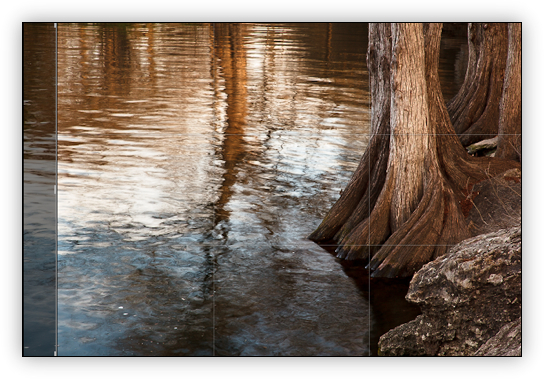
Next I tried using an 8 x 10 landscape aspect ration (shown above) that eliminated about 50% of the problem but still wasn’t quite enough.
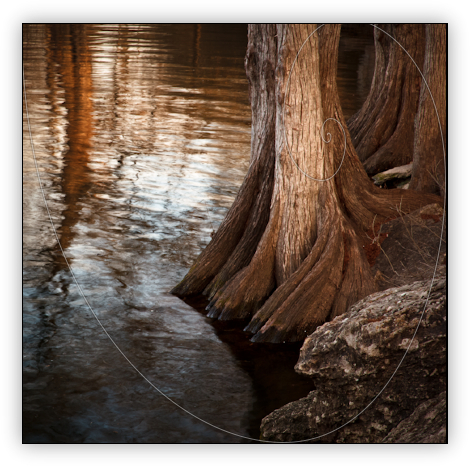
Finally I tried using a 1 x 1 aspect ratio with the “Golden Spiral” cropping guide and with a few tweaks here and there, I was finished. I captured all the elements I wanted to present (rocks, trees, water) and cropped the image to eliminate anything that might draw the viewers attention out of the image. I also used the “Post-Crop Vignetting” settings to help focus the viewer on the brighter tree trunk in the center of the “Golden Spiral” cropping guide. Using a 1 x 1 aspect ratio doesn’t always work in landscape photography (it’s fairly rare) but it’s another tool used to isolate your subject and focus your viewers’ attention right where you want it.
![]()


