Showing posts with label light. Show all posts

Thursday, April 2, 2015

Natural Light Portraits: Made In The Shade


One of the easiest ways to start shooting portraits is to use natural light. There's no added expense of buying speedlites or strobes, or even continuous lighting. You don't have to decide where to put the lights, because let's face it, nature has decided for you. There are still challenges however, and those challenges must be overcome to successfully pull off a natural light portrait. One of the biggest challenges is what to do when the natural light just is not pleasing. Maybe it's midday sun and the light is too harsh, or maybe it's later in the day and direct sun is shining right in your subject's eyes. In my post "Sun Too Harsh? Modify it!", I discussed ways to use reflectors and scrims to modify natural light to get a more pleasing look.
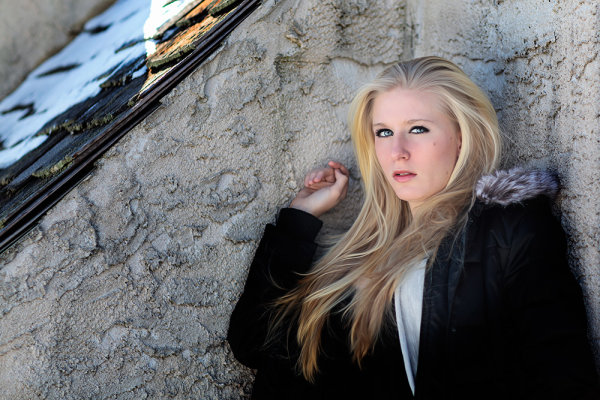

This image was taken on a bright sunny winter day, with snow on the ground. I didn't have a reflector- the snow helped with that thankfully.  But the sun was too harsh to put her directly in it.  The solution was to go behind one of the nearby buildings and use that softer light to illuminate her face. EOS 5D Mark II, Ef 85mm f/1.2L II. 1/2000 at f/2.2, ISO 160.


This image was taken on a bright sunny winter day, with snow on the ground. I didn't have a reflector- the snow helped with that thankfully. But the sun was too harsh to put her directly in it. The solution was to go behind one of the nearby buildings and use that softer light to illuminate her face. EOS 5D Mark II, Ef 85mm f/1.2L II. 1/2000 at f/2.2, ISO 160.


But what happens if you don't have a reflector or a scrim? Well then you have it made in the shade! Find some shade, and you'll find some soft, indirect lighting that can help you create beautiful portraits. Look for a large tree with overhanging branches. Or a doorway. Or an overpass of some kind. Anything that gets you out of direct sun, and into indirect light. It does you no good if there's no light getting to your subject, but once you find a place with indirect lighting, you're all set.
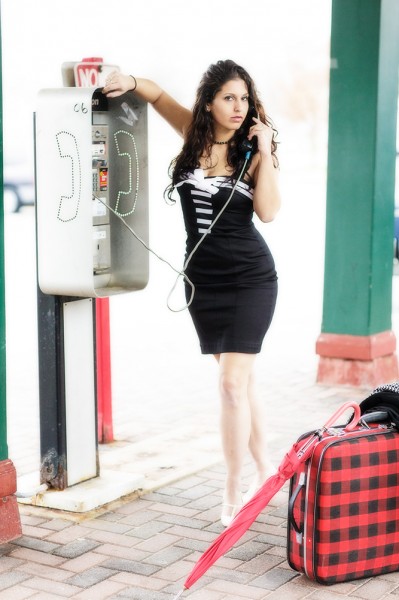

Here, the subject was positioned under the overhang of a train station.  Because it was an open overhang, the background is lit brightly, creating more depth. EOS-1D X, EF 85mm f/1.2L II. 1/1000, f/2.8 at ISO 640.


Here, the subject was positioned under the overhang of a train station. Because it was an open overhang, the background is lit brightly, creating more depth. EOS-1D X, EF 85mm f/1.2L II. 1/1000, f/2.8 at ISO 640.


The light will be soft and even- and very pleasing. The background will likely go a little darker depending on where you found your shade, be it under a tree, where it might be brighter, or in a doorway or behind a building. Look around, see what you can make happen. And just because your subject is facing out towards the light, doesn't mean you need to be. Walk around your subject- get that soft light hitting from the side, as well as the front. Just keep your subject positioned so the light is hitting the mask of the face, including the eyes. Just because the light is not pleasing doesn't mean all is lost. Sometimes, all you need to do is find some shade.
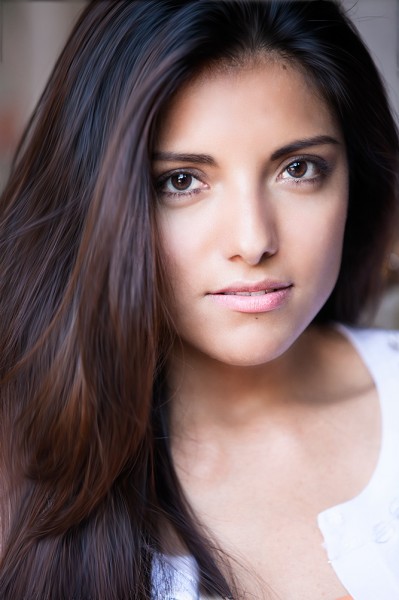

This shot was taken in Central Park in New York City, near Strawberry Fields.  There is a walking path that goes under a large footbridge, creating a tunnel. The day was a typical summer day, bright and hot. The sun was far too harsh. We moved to the opening of the tunnel and I let the light wash in on her face.  I turned her slightly so the light came from the side a bit, creating some shadow on the left side of her face. EOS 5D Mark II, EF 70-200 f/2.8L IS II. ISO 800, 1/250, f/2.8.


This shot was taken in Central Park in New York City, near Strawberry Fields. There is a walking path that goes under a large footbridge, creating a tunnel. The day was a typical summer day, bright and hot. The sun was far too harsh. We moved to the opening of the tunnel and I let the light wash in on her face. I turned her slightly so the light came from the side a bit, creating some shadow on the left side of her face. EOS 5D Mark II, EF 70-200 f/2.8L IS II. ISO 800, 1/250, f/2.8.


Post originally from: Digital Photography Tips.

Check out our more Photography Tips at Photography Tips for Beginners, Portrait Photography Tips and Wedding Photography Tips.


Natural Light Portraits: Made In The Shade


Tuesday, March 17, 2015

There is No Bad Light for Street Photography


One of the advantages of being a street photographer is that you certainly don't need to get up before dawn to catch the good light. Harsh sunlight, nighttime and rainy days are only a few of the most desired situations on the streets. Getting up too early, before people are out and about, may actually be counter-productive in your search for the decisive moment.


The key is to use light, any light, to your advantage


Any time of day or night, be aware of the quality and quantity of light, and look for interesting light sources and subjects.


  Val  rie Jardin


Val rie Jardin


Nighttime photography


The night adds a new dimension to your street photography. There are so many interesting light sources to work with such as street lights, traffic lights, car lights, neon signs, etc. Even bright Smartphone screens illuminating people's faces can make for a fun shot. Learn to focus manually for night photography. Even if the auto focus works in most conditions, practice switching to manual focus rapidly, it may save the shot!


It's true that a simple slider action in post-processing can bring out details from the shadows, but that doesn't mean that you should always use it. This is a common mistake that I see too often when the night scene starts to look like it was shot in the daytime. Let the shadows fall where they do and embrace the atmosphere and mystery of the night.


  Val  rie Jardin


Val rie Jardin


Don't worry about noise, especially if you shoot black and white. First, you can now push the ISO of most cameras to very high numbers with very little noise. Second, the little bit of grain in your pictures will enhance the mood and atmosphere. Likewise, embrace the motion blur and the slightly out of focus shots. Who says that a good image has to be tack sharp? What's the point of technical perfection if your subject is boring, or the story non-existent?


  Val  rie Jardin


Val rie Jardin


Silhouettes


The key to successful silhouette photography is to find a well-defined subject. Remember that not everyone makes an interesting street photography subject and the same principle applies to silhouettes. The shape of the body should be well defined, capturing the right gesture is even more important to achieving a strong image. Many elements can add interest as well, such as umbrellas, bicycles, hats, etc. Watch for obstructions in front of and behind your subject, and if they are moving, make sure you don't catch them in between steps. Setting your camera in burst mode will increase your chances of getting the right gesture. Remember that your subject is not the background, which can act as a distraction, so do not be afraid to blow out the highlights behind your silhouettes unless it is an integral part of the story.


In order to shoot successful silhouettes, you need to take control of your camera first. Instead to going through all the steps here, check out: How to Photograph Silhouettes in 8 Easy Steps.


Shooting into the bright sun


Shooting into the sun when it's low in the sky can create some dramatic shots. Add a sunburst effect when possible. The starburst effect is best achieved by setting your camera at a small aperture and hiding the sun partially behind a structure or person. Experiment with exposure compensation to get a nice dark silhouette and once you're happy with the result, wait for the right subject to enter your frame, or the right action to happen.


  Val  rie Jardin


Val rie Jardin


Strong shadows


Street photographers love shadows. Similarly to silhouettes, not every shadow works. It should be really dark and well defined. The surface on which it shows will also play a part in the result. It's important to strategize and position yourself to get the best possible shot, the shadow may hit a wall next to the subject for instance. Long shadows are also really interesting when shot from a higher vantage point. Sometimes it's all about the shadow, and the subject casting it does not even need to be fully included. This method, if well executed, will add an element of mystery.


  Val  rie Jardin


Val rie Jardin


Reflections


Sunlight can create some really cool reflections in windows, puddles, or other surfaces and add interest to your street photography. Don't be afraid to experiment!


  Val  rie Jardin


Val rie Jardin


High contrast situations


Harsh sunlight and deep shadows can create ideal situations for the discerning street photographer. The sun comes out after the rain? Even better! The wet pavement will add yet another dimension and interest.


  Val  rie Jardin


Val rie Jardin


Dappled light


One of my favorite daylight situations in street photography is when I find a nice source of dappled light. Remember that even if the situation is ideal, not every person walking down the street will make an interesting subject. It's often a game of patience...


  Val  rie Jardin


Val rie Jardin


Rainy days


As long as you protect your gear (and yourself), rainy days can provide some of the best street photography opportunities. People on the streets will behave very differently when it's raining, creating some interesting situations. Umbrellas also make for good props. There are also ways to embrace the rain by focussing selectively through windows, car windshields, etc.


  Val  rie Jardin


Val rie Jardin


Open shade for street portraits


If you enjoy doing street portraits, then the same simple rules that you apply for any other portrait will help you achieve the best result. Once you've asked your subject for a portrait, you might as well go the extra step and ask them to move slightly, or even cross the street for the most flattering light. Look for open shade to avoid harsh shadows on their face.


Golden and blue hour


Of course, there are also beautiful photographs of people to be made in the early morning and late evening hours, but always remember that there is no bad light!


  Val  rie Jardin


Val rie Jardin


Conclusion


Never use the quality of light as an excuse not to hit the streets. Making any light work in your favor is part of the fun and also the best way to improve your skills and get some cool shots. Have fun!


The post There is No Bad Light for Street Photography by Valerie Jardin appeared first on Digital Photography School.


Monday, March 4, 2013

Using Gobos To Create Dramatic Lighting


When lighting a subject, one of the things you want to try to do is create drama, or a context, using the light. This often means modifying your light source. One of the easiest ways to modify your flash to create a context, or drama, is to use a gobo.


In this shot, the gobo was used on the background light, to create the illusion of light shining through window blinds. The off camera flash was a Canon 580 EX II, with the gobo positioned in front of it. The light on the model was a 580 EX II in a Westcott 18x42 strip box.


In this shot, the gobo was used on the background light, to create the illusion of light shining through window blinds. The off camera flash was a Canon 580 EX II, with the gobo positioned in front of it. The light on the model was a 580 EX II in a Westcott 18 42 strip box.


Gobos are templates that go in front of your light source (“Goes Between” your light source and the subject) that have patterns cut out that control the shape of the light. They can help add mood, create the idea of a setting or context, and add interest.


This is my homemade


This is my homemade “windowblinds” gobo. It’s probably a bit larger (about 20 30) than it needs to be, but this helps ensure that it blocks out any unwanted stray light. You want to use flat black oak tag or mat board, as the black minimizes any reflecting light. Using a lighter colored material would reflect light that may not be wanted in the image.


Gobos can be purchased, but often times, the available patterns may not fit your need. In addition, they are relatively easy to make yourself and thus customize as needed.


Simply go to the nearest arts and crafts store, choose a piece of black oak tag, and a razor blade or exacto knife, and cut the desired pattern out. The pattern doesn’t need to be too large, keep in mind how large the flash beam is going to be at the point that it hits the gobo.


You may need to experiment a bit with the size and distance before getting the desired effect.


I will place the flash on a light stand, and then simply use a second light stand and use an A-clamp or two to hold the gobo in place. This way I can experiment easily with how far the gobo should be from the flash, and how far from the subject or background. A magic arm attached the light stand holding the flash will also work for holding the gobo.


For the accompanying photos, I wanted to create a night time mood, light projecting through the window blinds onto the wall from a street lamp. So I simply took the piece of black oak tag and cut a series of rectangles in it. When projecting flash through it, it resembles light shining through window blinds.


There are myriad other patterns that could be used to create various moods and effects. Play around and see what you come up with!


You can also use the gobo to modify light projected onto your main subject. In this instance, it creates an air of mystery about the subject.


You can also use the gobo to modify light projected onto your main subject. In this instance, it creates an air of mystery about the subject.


Post originally from: Digital Photography Tips.

Check out our more Photography Tips at Photography Tips for Beginners, Portrait Photography Tips and Wedding Photography Tips.


Using Gobos To Create Dramatic Lighting