Showing posts with label lightroom. Show all posts

Monday, May 4, 2015

Successfully Copy Photos from Your Memory Card to your Computer


Before you can begin editing your photos you need to get them safely off your camera and onto your computer. Unfortunately this process is often hijacked by (well-meaning if misguided) software which purports to do the work for you but leaves you wondering just where your photos really are! So, to help you understand your options for getting your photos onto your computer, here's what I recommend.


First of all: Take Charge!


The first thing to understand about getting photos from your camera card or camera onto your computer is that you're in charge. Any application that opens and tries to grab your photos for you can be closed down. If it is not the application you want to use then do just that - close it.


Now you can take charge and manage the process in a way that makes sense for you.


Choose your application


If you're using Photoshop then you can use Bridge to import your photos. If you are using Lightroom then you can launch Lightroom and import your photos using it. If you don't have either program, or if you prefer to manage the process yourself, you can do so using Finder on the Mac or Windows Explorer on a PC. I'll cover this process first, then look at Bridge and Lightroom.


Importing using Finder or Windows Explorer
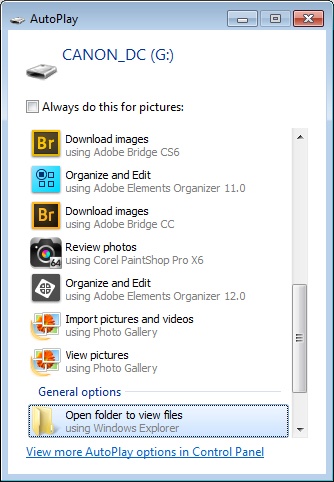

import-photos-using-Windows-1


When attached to your computer, a camera or memory card works like any drive, so you can view its contents. You can also copy photos from the memory card onto your computer's hard drive manually using Explorer or Finder.


On a PC, if the AutoPlay dialog appears when you insert your camera card or attach your camera, choose the Open Folder to View Files option.


If the dialog doesn't appear, simply launch Windows Explorer and select the drive that represents your camera or memory card.


Navigate to the folder that contains your photos - there may be multiple folders depending on how your camera stores images on the card. You can select the photos, then drag and drop them to the folder of your choice. It's often easier if you first open the target folder in a second Windows Explorer window so you can drag from one to the other.
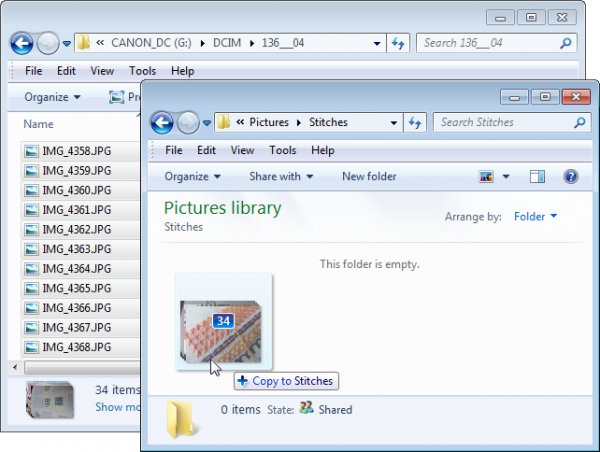


import-photos-using-Windows-2


The process is similar using Finder on the Mac. If iPhoto launches - stop it from downloading any photos and close it. Then you can drag photos from your camera card open in one Finder window, to a folder of your choice open in a second window.
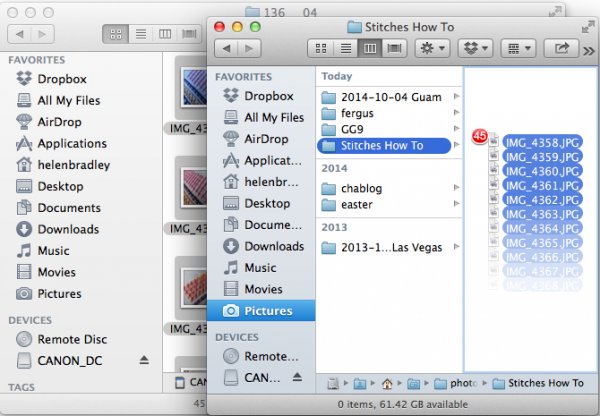


import-photos-using-finder-on-the-mac


Importing Photos using Bridge


If you are using Photoshop, launch Adobe Bridge and choose File > Get Photos from Camera. Click the button to open the Advanced Dialog.
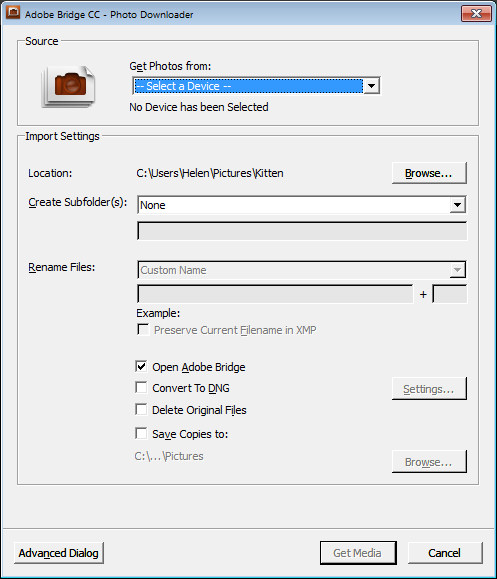


import-photos-using-bridge-1


From the "Get Photos from" drop down list select the drive letter that corresponds to your camera or card.
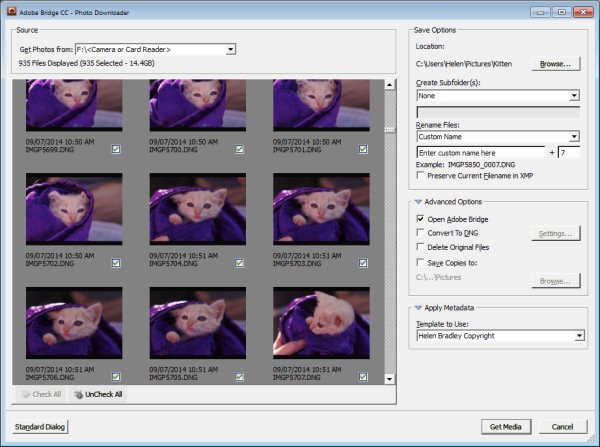


import-photos-using-bridge-2


You can now see and select the photos to import. This is one benefit of using Bridge over Windows Explorer - you will see thumbnail images of your raw files so you can see what you are importing.


On the right of the dialog select the folder in which to place the images. Typically this will be inside your My Pictures folder on your computer but you can choose any location that makes sense to you. However, if you want to find your photos later, on it is essential that you pay attention to the choices you make here.
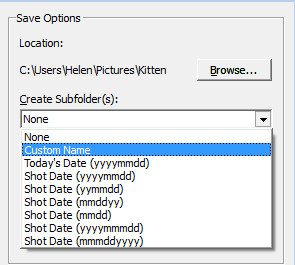


import-photos-using-bridge-3


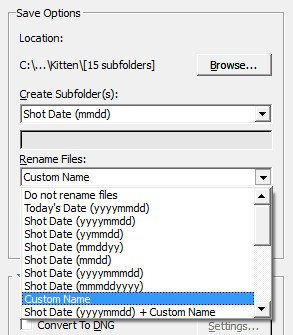
Once you have selected the folder to import the images into, you can, if desired, select a subfolder. In this way you can group photos by shoot, date or something that makes sense to you. Bridge will create the folder for you if it doesn't exist, so choose an option from the Create Subfolder(s) list and, if required, type a name for it or choose the date to use - either the capture date or today's date. If you don't want to organize photos in a subfolder then click None.


import-photos-using-bridge-4


You can also select to rename files on import, or not. Choose Do not rename files if you don't want them renamed or alternatively select a naming convention from the list.


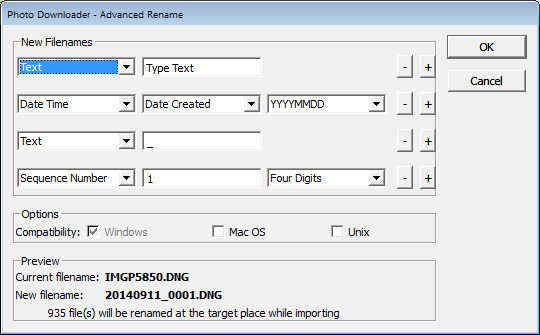
If you have advanced naming requirements for which the dialog does not provide an appropriate choice, scroll to the bottom of the list and click Advanced Rename to open the Advanced Rename dialog where you can create quite complex naming conventions. Whatever choice you make check the entry just below the dialog where Bridge shows you an example of the naming convention in place so you can check to see if it is what you want.


import-photos-using-bridge-5


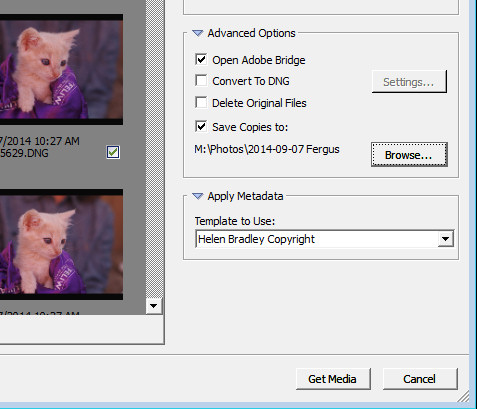
In the Advanced Options area you can choose other options including Convert to DNG - which is handy if your camera captures in a manufacturer specific format such as CRW, NEF, PEF and so on, but you prefer to work with DNG files. Select this option and Bridge will do the conversion for you.


You can also select Delete Original Files although this is not recommended. It's best to make sure that the images are correctly copied onto your computer before the originals are deleted so I suggest you leave this option disabled.


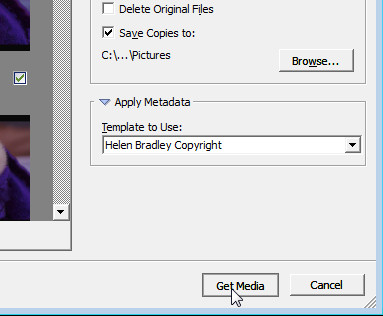
Bridge offers a backup option so it will make a copy of your photos on import. To do this, click the "Save Copies To:" checkbox and select an alternate location (such as an external drive) in which to save a copy of your photos.


import-photos-using-bridge-6


If you have a metadata template already created you can select this from the Apply Metadata drop down list.


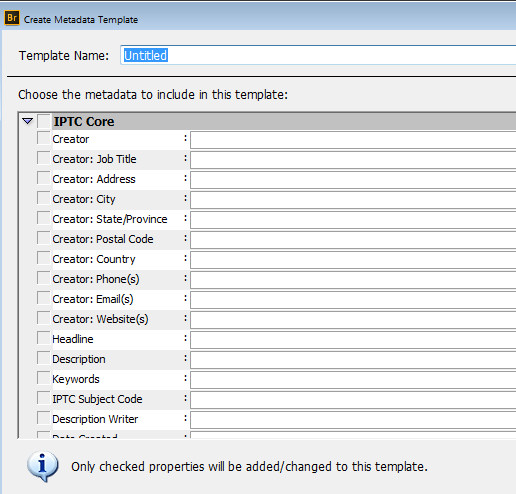
In future you can create such a metadata template in Bridge by selecting Tools > Create Metadata Template. I suggest that you complete the IPTC Core Data for Creator as well as Copyright Notice, Copyright Status and Rights Usage Terms. Also complete the Type Of Source entry in the IPTC Extension group. When completed this will give you a good all round metadata preset to apply to all your images. For more information on IPTC Copyright Metadata check out this article: Lightroom: Add your IPTC metadata on Import.


import-photos-using-bridge-7


When you have your import settings selected and configured to meet your needs click Get Media to import the images.


import-photos-using-bridge-8


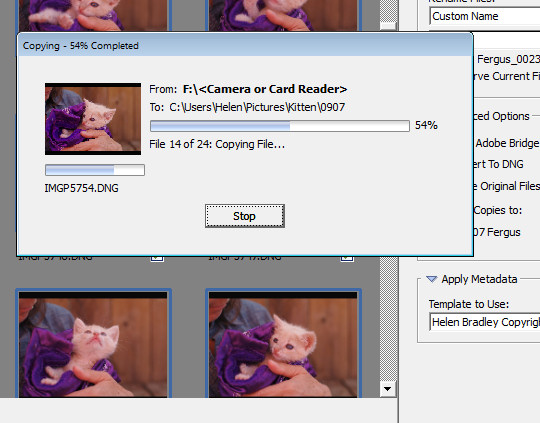
You will see a dialog showing you the progress of the import process.


import-photos-using-bridge-9


Importing Photos using Lightroom


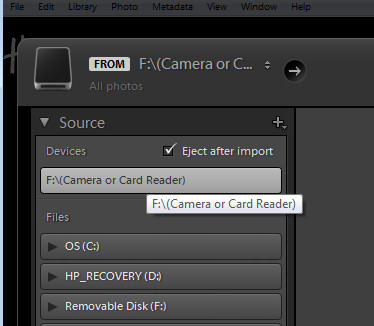
If you're using Lightroom then it is the obvious choice for managing the process of importing photos from your camera or memory card. From the Library module click Import, then select the source in the top left corner of the Import dialog.


import-photos-using-lightroom-1


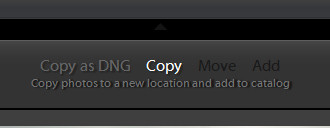
Across the top of the screen you will see only two choices, Copy as DNG and Copy. This reflects the fact that you're importing images from a camera card or camera - the options Move and Add are not available for this process (if you do see Move and Add as available options, it appears that Lightroom isn't recognizing your camera or camera card correctly and even though they may be available you should not use either of these choices).


import-photos-using-lightroom-2


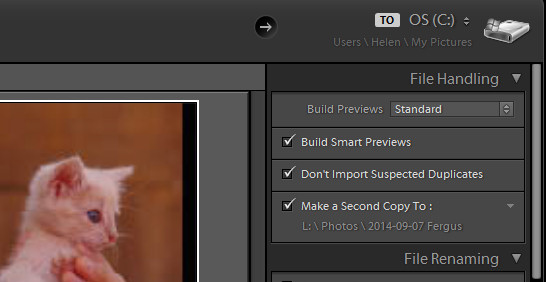
Next, open the File Handling panel on the right of the screen and select the kind of preview to create - Standard is a good choice. You can choose Build Smart Previews or not (if you're unsure, check Build Smart Previews).


Checking Don't Import Suspected Duplicates will ensure that Lightroom doesn't import images again, that you've already previously imported. This is one feature available in Lightroom which is not also available in Bridge.


In Lightroom you can also choose to make a backup by making a second copy of your photos to an alternate location as you import them.


import-photos-using-lightroom-3


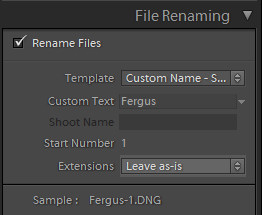
File Renaming panel allows you to rename images on import - you can select from a range of naming templates and even create your own. Here I've chosen to use the Custom Name - Sequence template so I've typed the Custom name and the sequence is set to start at 1:


import-photos-using-lightroom-4


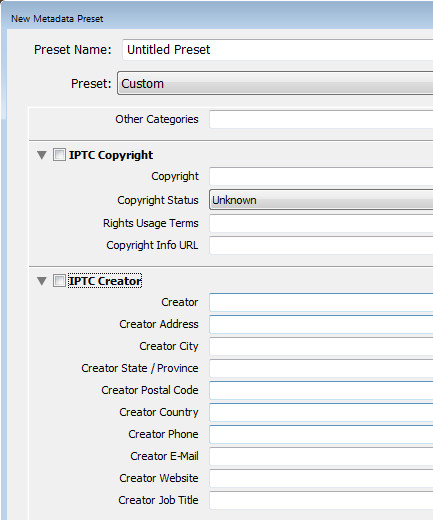
The Apply During Import panel has an option for applying metadata to the image upon import. Unlike Bridge the drop down list for Metadata presets also includes an option New which you can use to create your own metadata preset. I suggest you complete the IPTC Copyright and IPTC Creator details, and in the IPTC Extension Administrative select Original digital capture from a real live scene from the Digital Source Type drop down list. Type a name for the preset and from the Present drop down list click Save current settings as new preset.


import-photos-using-lightroom-5


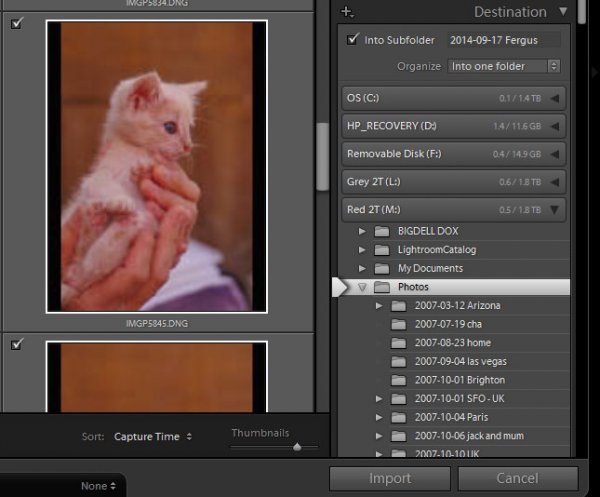
In the Destination panel you'll need to select the location into which the images are to be copied. If you're copying them to your hard drive then typically you'll select your C drive, then your My Pictures folder which should be in your Users area.


If you save your images to an external drive then select the external drive and the folder into which the images should be imported.


If the folder does not exist you can create a subfolder on import by selecting the Into Subfolder checkbox and type a name for the folder that Lightroom should create to import the images into.


import-photos-using-lightroom-6


From the Organize drop down list you can select to put the images into this folder (Into one Folder) or to organize them by date. Whichever choice you make you can see a preview of what's going to happen in the folder list, allowing you to check and make sure that everything is going to be imported and arranged to your requirements before you go ahead and complete the import process.
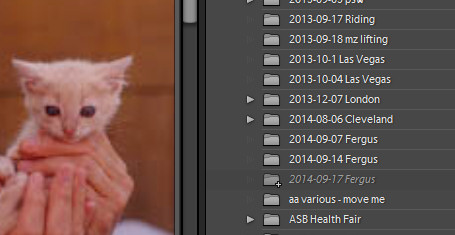


import-photos-using-lightroom-7


When you're ready to import the images click Import.


Whatever process you choose to use for getting images off your camera card onto your computer the acid test for whether it is a good system or not will be if you can find your images later on. Also be aware that it's advisable to make a backup copy of your images in case your computer is stolen, damaged or your hard disk crashes. For this reason a backup on a removable external drive is a sensible choice.


Having an import routine that you understand, and can reliably execute, is a necessary first step for any photographer. The worst possible scenario is to have copied your images from your camera card to your computer and erased them from your card, only to discover that you cannot find the images. It's a scenario that way too many users have encountered - don't let it happen to you!


Find a video version of this blog post here:


Do you have any other copy and import tips? Please share in the comments below.


The post Successfully Copy Photos from Your Memory Card to your Computer by Helen Bradley appeared first on Digital Photography School.

Wednesday, March 4, 2015

How to Retouch a Portrait with the Adjustment Brush in Lightroom


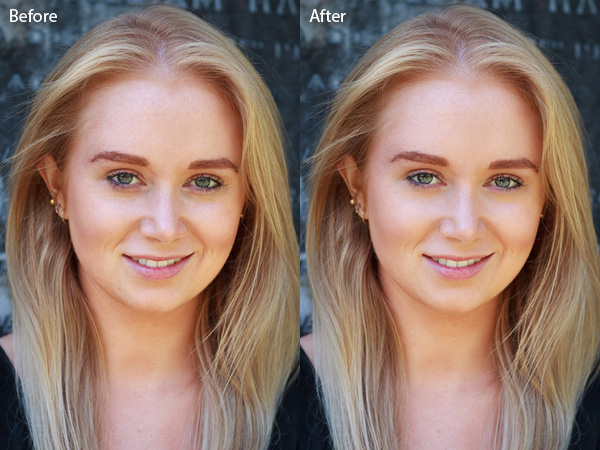
Portrait retouching Lightroom


You have probably seen several portrait retouching programs advertised in magazines or online, and wondered if they were worth buying. The answer is no. I have tried out quite a few, and the truth is that the Soften Skin preset in Lightroom does just as good a job as any of them. For most photographers Lightroom's retouching tools all are you will ever need. For high end retouching purposes you can go to Photoshop.


It's worthwhile taking some time to think about your personal approach to portrait retouching. Some photographers seem to like the airbrushed, almost plastic look of heavy processing. It's a style you see used a lot in commercial photography or movie posters.


Others will go for a more natural effect, and use the retouching tools with a light touch. That's definitely my approach, and it fits with my preference for natural light and for creating portraits that capture character.


Either way,the Adjustment Brush in Lightroom can accommodate your needs.


Retouching portraits of women


When retouching portraits of women it is conventional to use a skin smoothing technique to make the portrait look more flattering. There are exceptions of course, sometimes skin smoothing is not necessary, especially if your model has good skin and you shoot in soft light, or use a wide aperture to throw some of the face out of focus.


Portrait retouching Lightroom


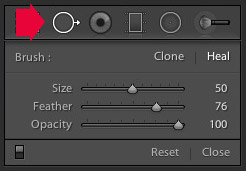
The first step in portrait retouching is to remove any blemishes with the Spot Removal tool. To do so, click on the Spot Removal tool icon to activate it, adjust the size of the brush with the square bracket keys on the keyboard, and click on the spot you want to remove.


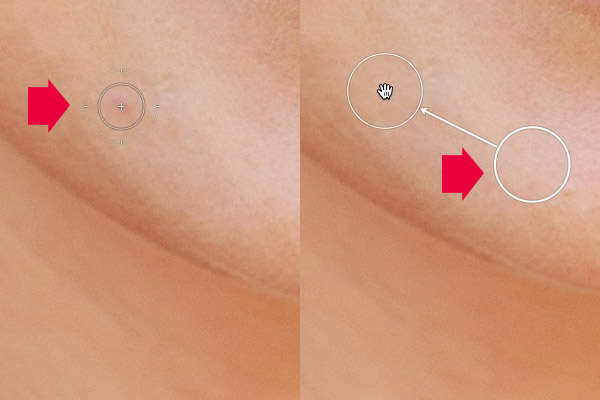
Lightroom automatically selects another area of the portrait to sample from, healing the blemish. Sometimes Lightroom won't select the most appropriate area - in this case you can click on the circle representing the sample and move it to a more suitable location.


Portrait retouching Lightroom


Click on a blemish with the Spot Removal tool (left). In this case Lightroom's healing algorithm worked perfectly, but if it doesn't then click on the circle representing the sampled area and move it to a location where the skin matches the tone and texture of the area to be healed (right).


Adjustment Brush adjustments


Now it's time to look closely at the portrait and decide what other retouching is required. It's important that you have already made the required adjustments to tone and contrast in the Basic panel before you get to this stage. Increasing Contrast and Clarity, for example, will emphasize skin texture, wrinkles and blemishes. On the other hand, you can move the Exposure or Highlights sliders right to brighten the skin, making wrinkles and skin texture less obvious. Retouching with the Adjustment Brush should be left until last, so you know what you're working with.


I like to start with the area underneath the model's eyes. The skin here is thinner than the rest of the face which is why people get dark patches there. There may also be wrinkles, and some people have a strong crease along the lower eyelid.


The idea is not to eliminate these completely (unless you're going for the heavily retouched, airbrushed look) but to minimize them. They're a natural part of the skin's texture and it will look unnatural if they are not there.


Portrait retouching Lightroom


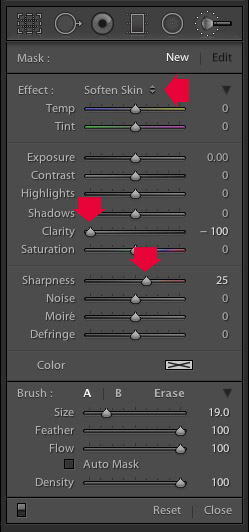
Click on the Adjustment Brush icon to activate it. Select the Soften Skin preset from the Effect menu. Lightroom sets Clarity to -100 and Sharpness to +25. Make sure Feather, Flow and Density are set to 100, use the square bracket keys on the keyboard to adjust the size of the brush and paint over the areas under the eyes. The Soften Skin preset blurs the area that you paint in with the brush.


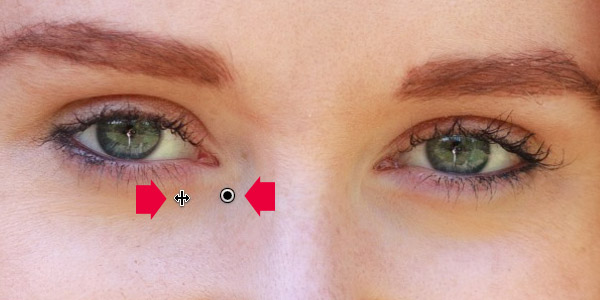
If the effect is too strong, hover the mouse over the Adjustment Brush pin (a grey circle with a black dot in the middle) until a double arrow icon appears (below). Hold the left mouse button down and move the mouse left. Lightroom reduces the value of the Clarity and Sharpness sliders, effectively lessening the strength of the Soften Skin preset. Stop when it looks about right. You can also reduce shadows by moving the Shadows slider (in the Adjustment Brush sliders) to the right. Every portrait is different so you have to adjust the effect by eye.


Portrait retouching Lightroom


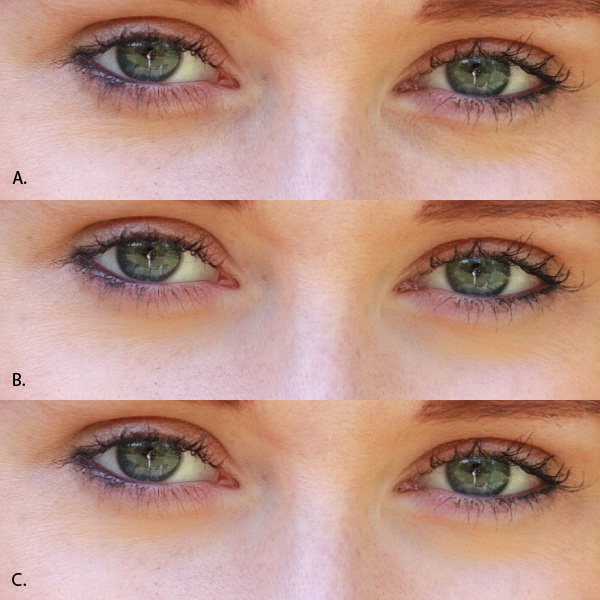
These are the results.


Portrait retouching Lightroom


A. Original, unretouched portrait.
B. Retouched, with Soften Skin preset at full strength.
C. Retouched, with strength of Soften Skin preset reduced and Shadows slider moved to the right (subtle difference only).


Enhancing eyes


You can also use the Adjustment Brush tool to enhance your model's eyes. This is useful if the eyes are dark due to the lighting. Be careful of overdoing this effect as it may not look natural.


Click New at the top of the Adjustment Brush panel to create a new Adjustment Brush. Set Feather to around 50 and paint in the pupils of the model's eyes. If you need to, press O (the letter) on the keyboard to see the masked area (it is displayed in red shown below).


Portrait retouching Lightroom


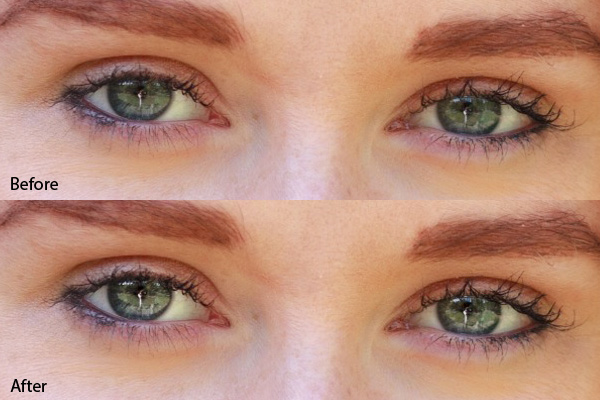
Now set Exposure to around 0.50 and Clarity to 30. The effect will vary depending on the colour of your model's pupils and the amount of light on them. It's a good idea to zoom out and look at the entire portrait to see if the effect is too strong. You can see this adjustment on the model's eyes below, which I think is about right.


Portrait retouching Lightroom


You can make the effect stronger or weaker on your photo using the technique described above. Hover over the Adjustment Brush pin until the double arrow icon appears, move the mouse left to make the effect weaker, and right to make it stronger (you can also just drag the sliders one by one to change the settings)


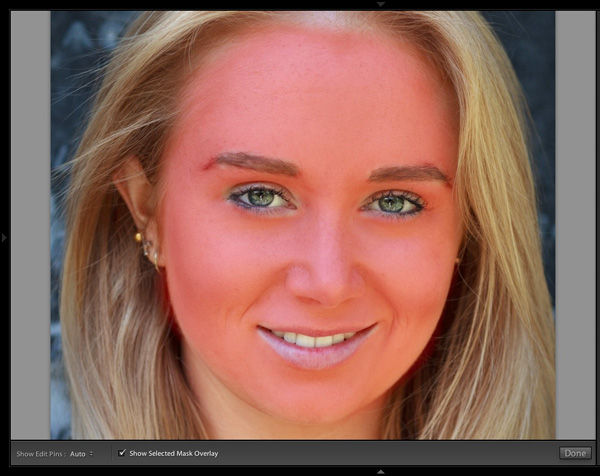
The final step is to apply gentle skin softening to the rest of the face. Create another Adjustment Brush, set Feather to 100 and paint the entire face (use the O keyboard shortcut to display the red overlay). Then select Erase in the Adjustment brush panel, set Feather to 50 and erase the eyebrows, mouth and eyes. The idea is that you only want to soften the skin, not these parts of the face. It should look something like the mask below.


Portrait retouching Lightroom


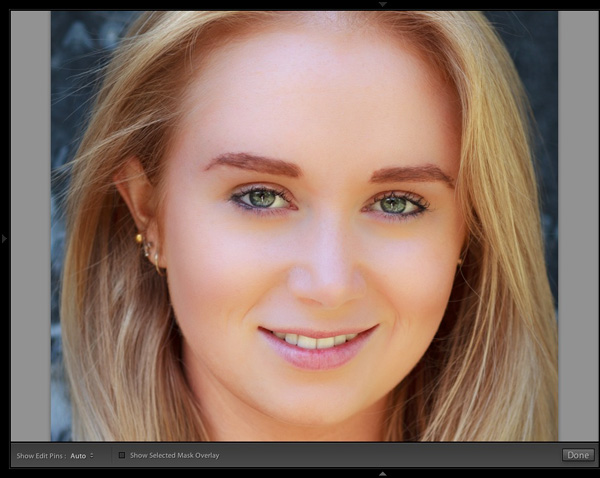
Go to the Effect menu and select the Soften Skin preset. Press O to hide the mask overlay and you will see something like the screenshot below. Remember, this is the Soften Skin preset at maximum strength so it has a strong effect on the photo.


Portrait retouching Lightroom


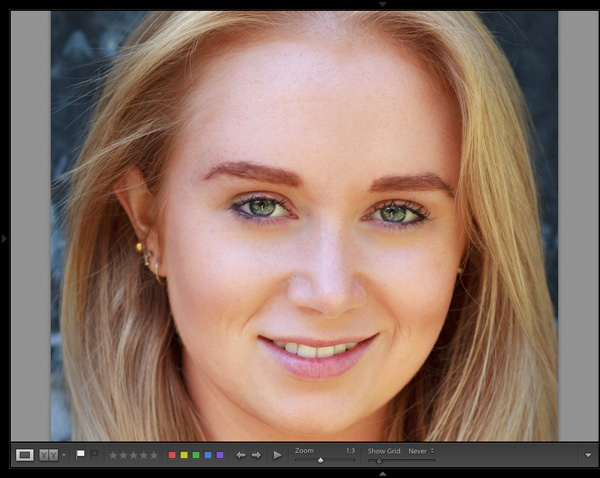
Use the technique we learned earlier to reduce the strength of the effect. How far you go is up to you. I like to apply the Soften Skin preset subtly to retain as much skin texture as possible. Here's the result with Clarity reduced to -20 and Sharpness to +5.


Portrait retouching Lightroom


This video shows how I retouched another portrait, using the Adjustment Brush tool to enhance the model's eyes and facial hair.


I've only touched on the number of ways you can use Adjustment Brushes in Lightroom for portrait retouching. What techniques do you use? Please let us know in the comments.


The Mastering Lightroom Collection


Mastering Lightroom ebooks


My Mastering Lightroom ebooks will help you get the most out of Lightroom 4 and Lightroom 5. They cover every aspect of the software from the Library module through to creating beautiful images in the Develop module. Click the link to learn more or buy.


The post How to Retouch a Portrait with the Adjustment Brush in Lightroom by Andrew S. Gibson appeared first on Digital Photography School.

Monday, February 9, 2015

How to Create a Simple Blurb Photo Book in Lightroom


How to create a simple photo book in Lightroom


The easiest way to get started with Lightroom's Book module is to create a simple photo book, letting Lightroom do most of the work for you so you don't get bogged down in the extensive design process involved in making a more complex book.


Things to do before you start


You will make the book design process much easier by doing, or at least thinking about, the following things before you start:


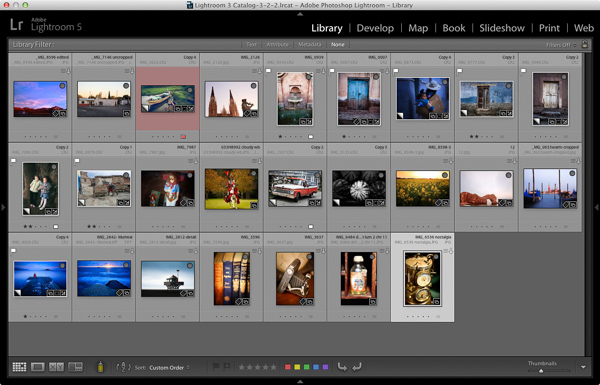
  • Select which photos you're going to include. Or at least narrow it down as much as you can. You might change your mind many times as you work on the design. Organize them in a Collection.
  • Arrange the photos in the approximate order they will appear in the photo book by clicking and dragging. You can do this in the Filmstrip in the Book module, but it is much easier to do it in Grid View in the Library module. It helps if you have created a Collection containing the photos you wish to include in the photo book. Again, this doesn't need to be precise as you will probably change your mind as you work your way through the design process.

How to create a simple photo book in Lightroom


  • Choose photos for the front and back covers. The cover photo is the first one in the Collection, the back cover photo is the last. You can change your mind later if you need to.
  • Process your files, if required. Naturally, you have probably already processed the photos you would like to include in your book, but are the photos processed in a consistent way? For example, if you are creating a book containing toned black and white photos have they all been toned the same colour, or are they different? It might be better for the book if they are all toned the same colour. If your photos need processing, it may be helpful to make Virtual Copies, so the originals are unaffected by the changes.
  • Pick which Blurb photo book size to use. There are five to choose from: small square, standard portrait, standard landscape, large landscape and large square. Sizes and prices of Blurb books are outlined on Blurb's website.
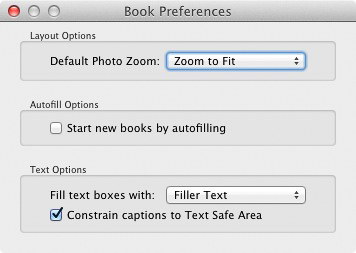
  • Go to Book Preferences, which are found under the Book menu in the Book module (you can't open them from any other module). Set Default Photo Zoom to Zoom to Fit and leave the Start new books by autofilling box unchecked. The other settings don't matter for simple photo books.

How to create a simple photo book in Lightroom


Creating a simple photo book


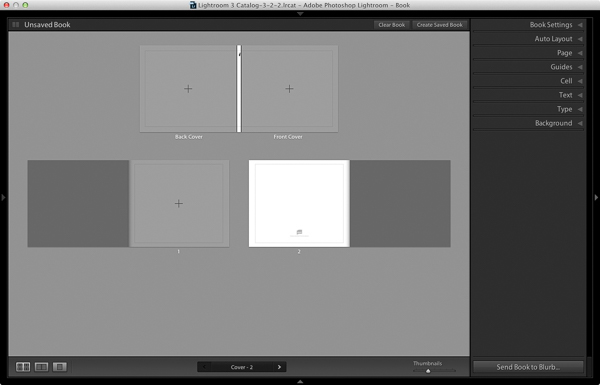
Go to the Book module. If you set your Book Preferences as recommended above, you will see something like this.


How to create a simple photo book in Lightroom


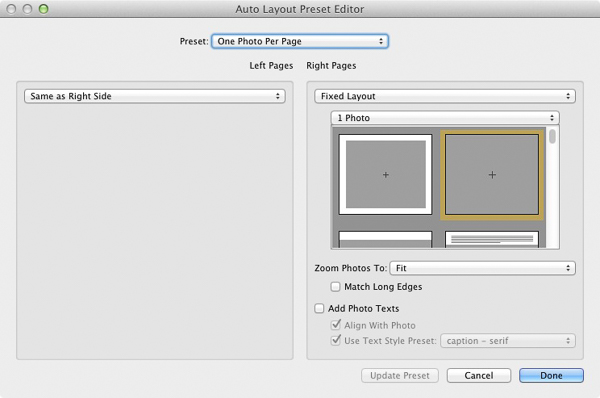
Regardless of what you see on screen, start by clicking the Clear Book button at the top of the Content window. Then go to the Auto Layout panel, set the Preset to One Photo Per Page and use the drop down menu accessed by the double arrow icon to select Edit Auto Layout Preset. The Auto Layout Preset Editor window opens (below). Look for the Zoom Photos To setting and set it to Fit (if it isn't there already). Click the Done button at the bottom of the window.


How to create a simple photo book in Lightroom


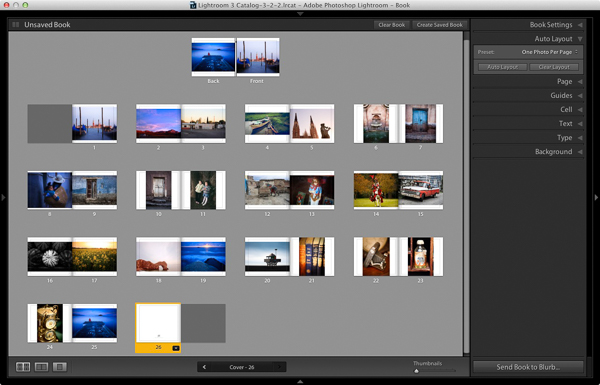
Click the Auto Layout button in the Auto Layout panel. Lightroom creates the book for you. It will look something like this, depending on the number of photos in your book.


How to create a simple photo book in Lightroom


At this stage you will see the words Unsaved Book in the top-left corner. They indicate that the current book layout hasn't been saved. Click the Create Saved Book button. This prompts Lightroom to open the Create Book window and create a Book Collection - a specialized type of Collection containing photos used in a photo book.


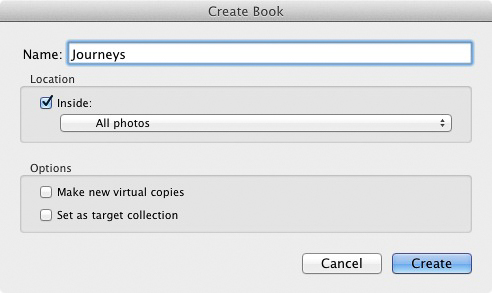
Give the book a name and select a Collection Set to store it in. Click the Create button. Lightroom duplicates the current Collection and turns it into the new Book Collection. It is displayed in the Collections panel with a book icon to differentiate it from other Collections. The name of the Book Collection is also displayed in the top-left corner of the Book module. Lightroom updates the Book Collection every time you make a change, so you can come back to it at any time without losing your work.


How to create a simple photo book in Lightroom


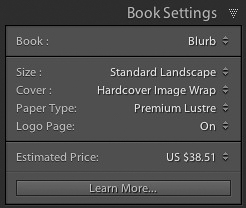
Go to the Book Settings panel and select the Size of the book and the type of Cover you'd like (I chose Standard Landscape with Hardcover Image Wrap for this example). It's important to decide now which you want, as it may affect the layout if you change them later.


Lightroom displays the estimated price of the photo book at the bottom of the panel (click the double arrow icon to the right of the price to see it in a different currency). The figure changes according to the size of the book, the number of pages in it, and the Paper Type (there is more information about paper types on Blurb's website.


You can save money by including the Blurb logo page - an extra page at the back of the book with Blurb's logo. Doing so gives you a discount, but adds an extra page to the layout.


http://www.blurb.com/proline


The first and last photos in the Book Collection are used as covers, but Auto Layout also adds them as the first and last photos in the book. If you don't want them in those positions then you need to remove them.


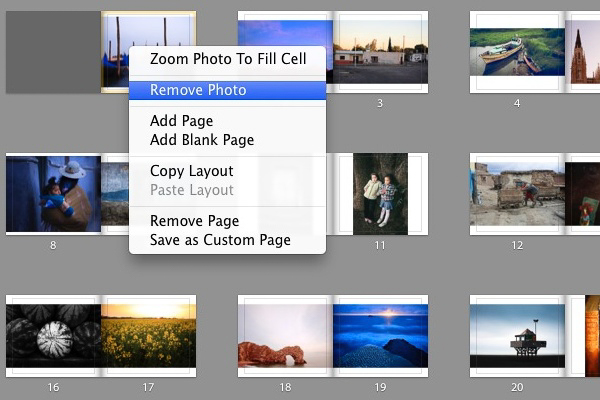
Starting by going to the first image, right-clicking and selecting Remove Photo.


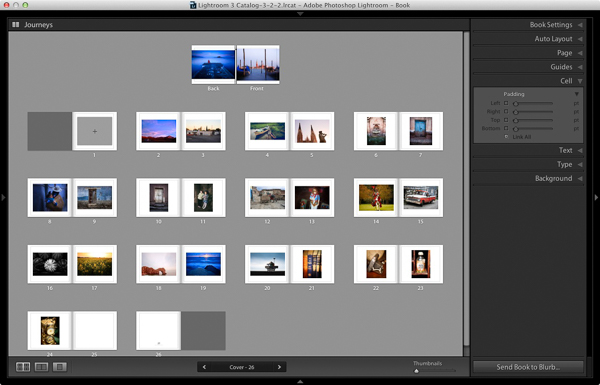
You should now see a grey square with a cross in it (if you don't, go to the Guides panel and tick the Show Guides and Photo Cells boxes). The icon indicates the page contains an empty Photo Cell - Lightroom's term for the spaces allocated to photos within the layout.


The left-hand page is dark grey, indicating that it's the inside of the front cover, and that you can't add anything to it.


How to create a simple photo book in Lightroom


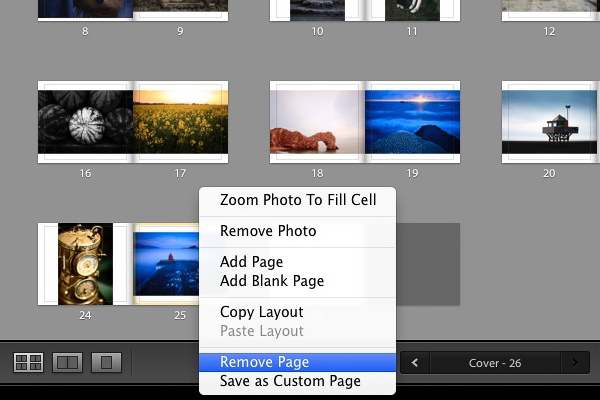
Repeat the process with the last photo in the book. This time, right-click the photo and select Remove page.


How to create a simple photo book in Lightroom


Add a white border


The next step is to create a white border around the photos in the book, rather than run them up to the edge of the printed page. The photos will be smaller, but the additional white space will give the book a more professional look.


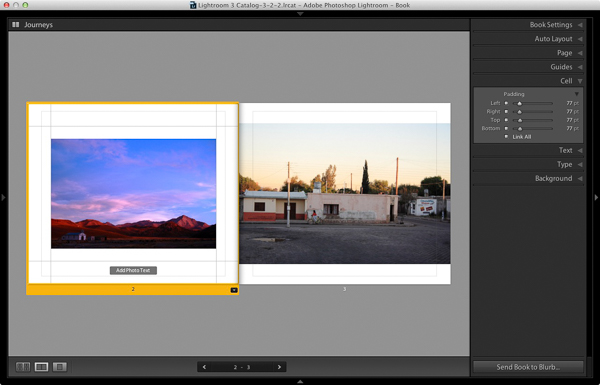
Click on a page containing a photo in the landscape orientation to activate it and go to the Cell panel. Grab the bottom slider and move it right. The other sliders should move with it at the same time (if they don't, click the grey Link All square - when all the squares are white, they will move together). Adjust the sliders until the photo has a solid white border around it like the one in the screen shot below.


How to create a simple photo book in Lightroom


Right-click on the page and select Save as Custom Page. Switch to the Multi-Page View and go to Edit > Select All to select all the pages in the book (the cover isn't included).


Click any arrow in a yellow frame, go to Custom Pages and select the page layout you just created. If this is the first time you have done this, it will be the only one there. Lightroom updates the selected pages with the chosen layout.


How to create a simple photo book in Lightroom


Design the covers


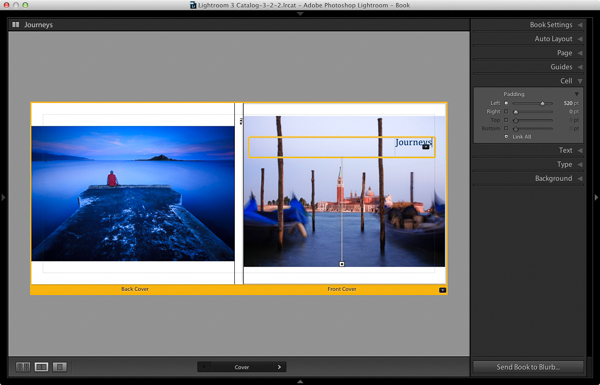
Go to the covers spread, click on the front cover and then the grey Add Photo Text button at the bottom. Type in the book title. You can change the font colour, size, and text in the Type panel. Click and drag the yellow border to move the text.


You can't change the width of a Photo Text Cell. But you can easily move the title left or right by going to the Cell panel and moving the Left slider until the title is positioned where you want it.


How to create a simple photo book in Lightroom


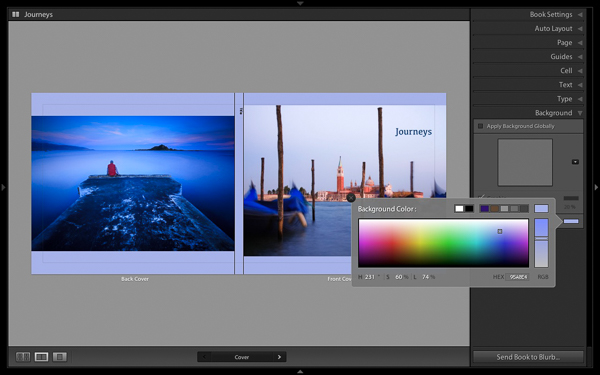
Open the Background panel and select a background colour that complements the front and back covers.


How to create a simple photo book in Lightroom


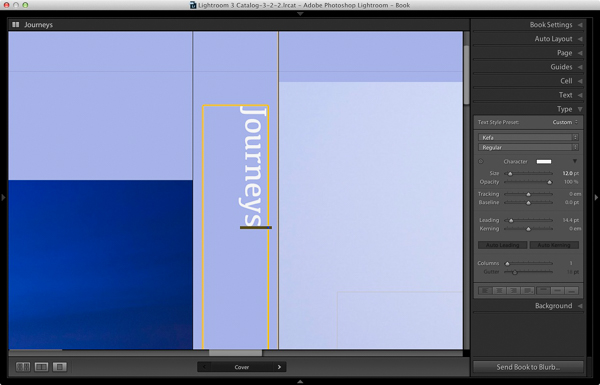
Go to the title on the spine of the cover, and change it to the title of your book. For consistency, you should use the same font you selected for the title on the front cover.


How to create a simple photo book in Lightroom


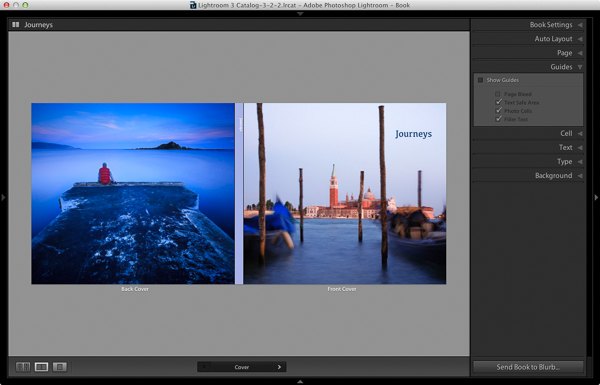
Another option for the cover is to expand the photos so that they fill the available space. This will crop the photos, which you may not want, but can look really effective. You may also need to move the title. To do so, right-click on the cover images and select Zoom Photo to Fit Cell. This is what it looks like with my covers.


How to create a simple photo book in Lightroom


Congratulations, you have finished your photo book! There are lots of ways you can tweak and improve your design in the Book module, I may go into those in a later article. But hopefully you now see how easy it is to get started in the Book module. Indeed, if you are happy with this simple design, you can create a photo book in a few minutes.


Uploading your photo to book to Blurb


In order to print your book with Blurb you need a Blurb account, which you can sign up for on their website.


Then, press the Send Book to Blurb button underneath the right-hand panels. Lightroom prompts you to sign into your account. Then, enter the title and author's name and click the Upload Book button. The upload takes some time, but when it's done you can sign into your Blurb account online and see your book. Leave this step until you're ready to order though, as Blurb will delete the book from your account if you don't order at least one copy within 15 days.


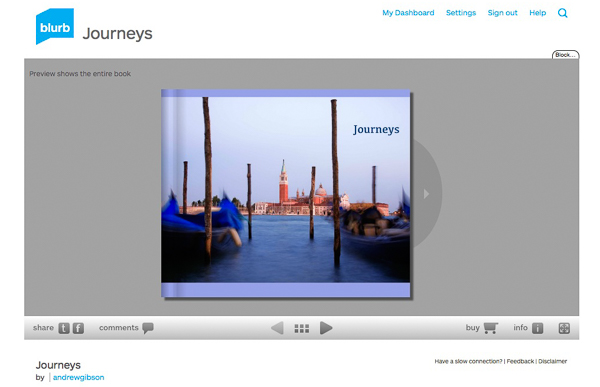
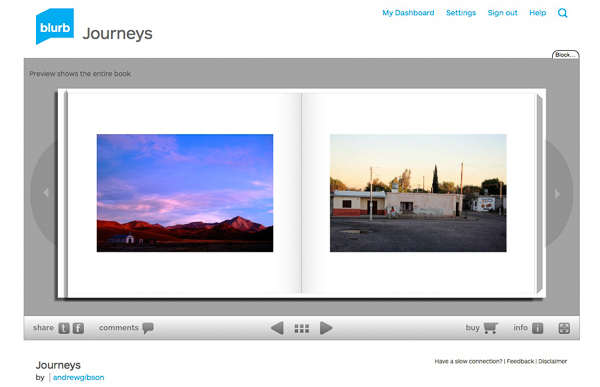
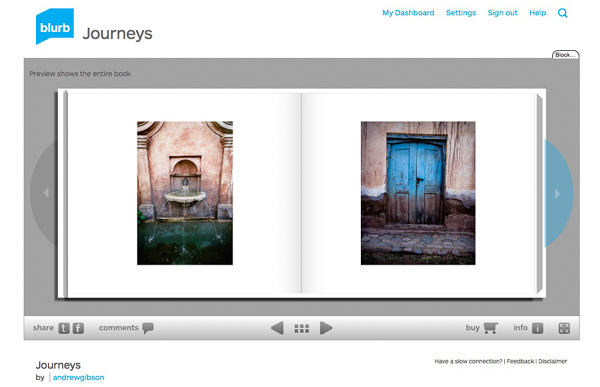
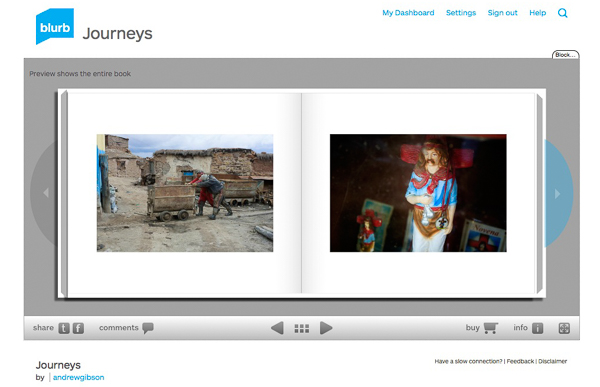
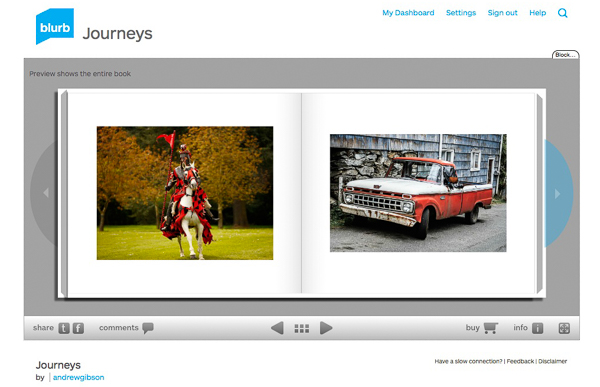
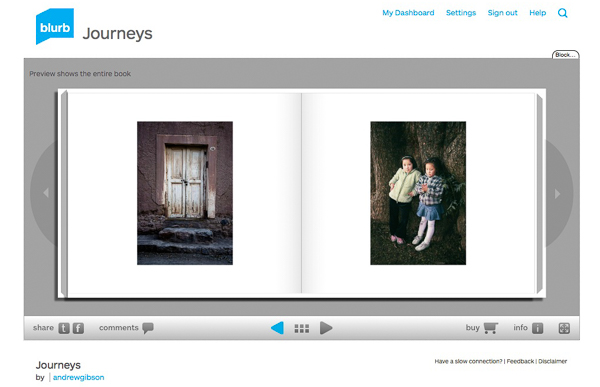
Here are some preview pages from the photo book I just created.


Have you made a book yet? Please share your comments and questions below.

lightroom-create-simple-photo-book-18


How to create a simple photo book in Lightroom


How to create a simple photo book in Lightroom


How to create a simple photo book in Lightroom


How to create a simple photo book in Lightroom


Mastering Lightroom: Book Five - The Other Modules ebook cover


Mastering Lightroom: Book Five - The Other Modules


My new ebook Mastering Lightroom: Book Five - The Other Modules shows you how to use Lightroom's powerful features to create fun and interesting projects using the Map, Book, Slide show, Print and Web modules. Whether it's geotagging, putting together a photo book, printing your best photos or creating web galleries all the information (and inspiration) you require is right here.


The post How to Create a Simple Blurb Photo Book in Lightroom by Andrew S. Gibson appeared first on Digital Photography School.