Showing posts with label studio. Show all posts

Sunday, January 26, 2014

A Few Tools that You Will Need for Indoor Portraits


When you make the decision to build an indoor studio, you are creating your very own space to do with what you want for portrait photography. Digital photography has certainly helped to minimize the equipment that you will need for portraits. However, this does not change the fact that you will need certain tools to create the most perfect portraits each and every time someone steps into your studio.


backdrop


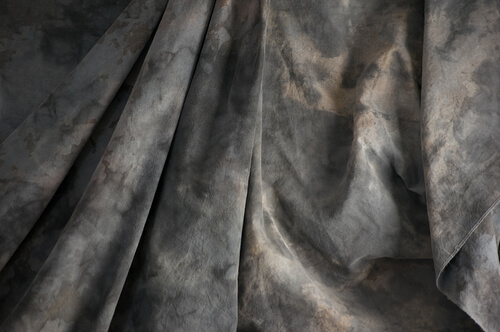
grey mottled photographer’s background cloth via Shutterstock


The Portrait Backdrops


One of the most important tools of the indoor studio will be the backdrop. As you will find, any professional photographer will have numerous different backdrops in order to create the perfect setting for the portrait session. Backdrops can create an extremely formal image for a business portrait or even an extremely casual image for children's Easter portraits. Of course, backdrops are not cheap, so you will want to choose them carefully or even consider creating your own.


The solid background can easily be created with seamless paper. The paper is available on rolls of 9 feet or 12 feet in width making them easy to transport. They are also available in numerous different colors providing plenty of opportunities. Of course, there is a downside to paper backgrounds. It takes very little for them to be damaged. One misstep and the paper could end up with a big tear. In addition, the paper is only available in solid colors so you will not be able to create much visual interest. Solid papers are great for modern or basic images.


Linen is a choice that many people make for solid backdrops. These fabric backdrops can be much more cost friendly than the painted backgrounds mentioned below and they are available in various colors. The downside would be that the backdrops can get wrinkled very easily so they will need to be stored properly.


Painted backdrops are often favored in the digital photography world because they offer extreme visual interest and a formal elegance to any indoor portrait. If you choose to purchase one of these backdrops, then you will need to be prepared to shell out some big money for them. Painted backdrops on muslin or canvas can cost upwards of $300 each. Of course, they are extremely durable so you can continue using them for years to come as long as the style does not become obsolete.


If you feel that painted backdrops are out of your digital photography budget, then you can create your own background. You will only need a few simple tools: a large piece of canvas, paint in several colors, and sponges. You can use sponges or other materials to apply the paint in an abstract or swirly cloud look.


The backdrop is not the only digital photography tool that you will need for your indoor portrait. You will also need a way to hold that backdrop up. Backdrop stands can range greatly in price and style. Permanent stands will allow you to set up interchangeable backdrops in your studio on a long term basis. Portable stands fold up for easy travel and they include a bar for the backdrop as well as two tripod like devices as legs for the stand.


Lighting


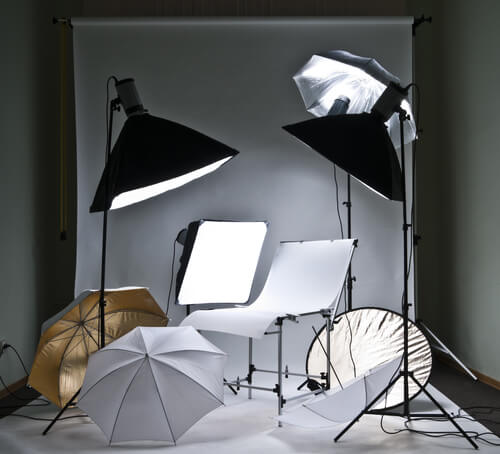
Large photostudio with lighting equipment via Shutterstock


The Lighting


For indoor studio portrait photography, you will also need to choose the right lighting. Portrait lighting can vary immensely in price and style so you will need to consider how much you are willing to spend on your studio. One of the most versatile options would be incandescent lighting. This type of lighting will give you a nice overall look. You can count on incandescent lighting to always look the same so you can easily set up your camera exposure and leave it the same throughout the studio session.


However, incandescent lighting is not always the optimal option since it can be harsh and glaring. Because incandescent is often more red in color than flash lighting, you will need to consider changing the white balance on your camera to compensate.


studio tools


Photostudio equipment via Shutterstock


Other Helpful Studio Tools


Thankfully, there are so many advancements in digital photography that you will find a wide variety of tools available to use in your studio. You can fine tune each image that you take to look exactly perfect to capture the image and the personality of the subject. Here are a few of the tools, or gadgets so to speak, that you could make use of in your studio.


Reflectors are actually a helpful tool indoors or outdoors. These reflectors can be used to bounce light from one source to another area. This is a good way to get even illumination without harsh shadows. Reflectors are usually made of Mylar or foam board with an aluminum cover.


When it comes to portrait photography, especially of women and children, you will definitely want to consider diffusers. These diffusers, which fit over flash lighting, will create a softer effect that can provide even skin tones and an avoidance of harsh light.


Umbrellas are often used in studio digital photography. These umbrellas, which are usually made of either a sheer or a reflective material, are design to help trap and diffuse light. Normal umbrellas work to keep the rain out while the studio umbrellas are made to keep light in.


Barn doors are a specialty tool that is used to direct lighting specifically. If you are trying to create dramatic shadows in an image, these small devices can help to do just that by directing the light in the path that you want it to go.


When you make the decision to build your indoor studio, you will want to take special care to choose the right tools for perfect digital photography of people. Of course, the camera will be an important tool, but you will also need backdrops, lighting essentials and other helpful tools and gadgets. With the right tools, you can create portraits that will truly capture the image of each person you choose to photograph and you can do so in the most pleasing manner.


Top feature image man and woman in a modern photo studio via Shutterstock


Sunday, January 6, 2013

How I Shot & Edited – The White Infinity Setup


The Classic White Infinity Backdrop


In my last post about studio photography (the killer clamshell) I covered a simple two light setup for achieving a gorgeous soft beauty look. This time I thought it might be fun to cover something a bit more general purpose and for this there cannot be anything better than the ever classic white infinity setup.


The All Can Do Lighting Setup


There is a reason why pretty much every major fashion or lifestyle magazine makes good use of a white backdrop and that reason is simplicity. Not only is this lighting arrangement incredibly easy to achieve but it also delivers sharp, detailed portraits with a beautifully clean and uniform background and most importantly no visible seams or edges. Aesthetics aside its also great for beginners to try as if done correctly provides a large and consistent zone in which to place your subject, allowing you to concentrate less on the position of your lights and more on placing and posing your model.


Families, pets, models, products the white infinity background is probably one of the most versatile setups going and to help you get started here is my approach to nailing this fantastic lighting arrangement:


Disclaimer


Ok, confession time. The images and steps below are 100% genuine and therefore its going to be pretty obvious that I screwed up my exposure during this shoot. Before you hit the big red 'X' at the top of your browser .. I can explain. I basically had about 10 minutes to set everything up and 30 mins to take the shots before my studio rental was over. Because I was in a rush I failed to spot that a large portion of the floor area was under exposed (by about a stop). I promise I don't do this all the time and if you don't believe me check please feel free to check out the studio section of my portfolio site. Hopefully by showing you my mistakes you will avoid them in the future.


Equipment


This lighting setup requires three lights and is best achieved using studio strobes as opposed to speed lights given the extra power needed to blow out the background. As I have said before, hiring a studio is a cheap and very effective way to get access to this kind of equipment, making this shot all the easier to achieve. If you do decide to do this at home however I would definitely recommend spending a little bit of money on a decent quality background paper, you can use a fabric backdrop but in my experience this will absorb much more light making the exposure more difficult than a non fabric setup. Its also important that you have a background which is long enough to span both the back wall and floor of your shooting space.


For this setup you will need:


  • Two lights for the background, preferably with some form of diffuser to spread and soften the light.
  • A main light with as large a diffuser as you can possibly get, an octobox is ideal however any softbox or umbrella will also work.
  • If possible a light meter is also a great tool for this setup and will help speed up the setup although it isn't essential.

The Lighting Setup


The important thing to achieve is a background that is both evenly exposed and completely blown out (i.e. solid white). The ideal result is to have a background that is twice as bright as your subject, the trick here being the ratio of light as opposed to absolute values.


Typically I will set the exposure for my subject using an aperture of around f8. Therefore if we want to achieve a background which is twice as bright we need to expose the background at an aperture which is one stop smaller than that used for the subject.


Just in case this doesn't make complete sense, changing the aperture by one stop will either halve or double the available light. Therefore if when we meter the background we use an aperture which is one stop smaller than the subject, when we open this back up again to take the final shots the background will now be twice as bright as the subject.


Here is how I go about getting this all set:


  1. Assuming a subject aperture of f8, set your camera to manual and dial in an aperture of f11 and a shutter speed of around 1/125 of a second with your lowest ISO.
  2. Aim the two background lights at the backdrop, positioning them to provide as even a spread of light as possible and either fire the stobes or take a test shot. Take care to only expose the background, try to avoid any of the light spilling forward onto where the subject will be.
  3. If you have a light meter you can now use this to adjust the power of the background lights until you get an even exposure of f11 across the entire backing. If you don't have a light meter set the exposure by taking a test shot of the background, varying the power until the entire backdrop is solid white and evenly exposed. If your camera has it you can use the highlight clipping warning combined with the histogram to double-check your results. Remember to check the floor as well as the background, don't make the same mistake as I did.
  4. Now its time to set the subject exposure, before doing so adjust your camera settings to f8 keeping everything else the same.
  5. Now turn off the background lights and place your subject in position. Again if you have a light meter you can use this to confirm the right flash power to achieve an f8 exposure. If you don't have a light meter set your subject exposure by varying the flash power on your main light until you achieve an exposure that looks right.
  6. Now turn all your lights back on and you are all set.


Two background lights and a main subject light.


The Post Processing


Obviously you can post process your final images however you like but just in case you are looking for a few pointers here is a brief overview of my workflow and more importantly how I overcame my exposure malfunction.


Starting Point - Notice the horrible 'yellow' area of underexposed floor.


Step 1: White Balance & Crop - Basic adjustments to get the colour right and to straighten up the slight slant on the composition.


Step 2 - Minor exposure adjustment (slight exposure and fill light) to get the subject lighting right.


Step 3 - Contrast corrections using via a minor curves adjustment (slight 'S') and added detail via Clarity.


Step 4 - Now its time to fix the badly exposed floor. This was done using a gradient filter from the bottom up to increase the exposure on the area on the floor. Minor imperfections were cloned out using a spot healing brush.


Step 5 - All done, final image completed. Much better than the start as I am sure you will agree. All in all this took less than 2 minutes and would have been much less if I had got the exposure correct from the start.


Summary


The white infinity backdrop is a fantastically versatile and satisfying lighting setup and one which I would definitely recommend to anyone wanting to try something different to a single light arrangement. Hopefully the tips here will help you to have a go at this classic lighting look, unfortunately though finding the super model is down to you!


Post originally from: Digital Photography Tips.

Check out our more Photography Tips at Photography Tips for Beginners, Portrait Photography Tips and Wedding Photography Tips.


How I Shot & Edited – The White Infinity Setup