"Do I really need to use all these filters for my landscape shots or can I just fix them in post?"
Believe it or not, this question has been around about as long as photography has. In the days of black & white film and "wet" printing, photographers spend hours and hours "dodging and burning" their enlargements to compensate for areas of different exposure values. It was an art form at its very best. Photographers would create all sorts of dodging and burning "tools" to assist in this process and the end result could be spectacular (Ansel Adams) or just plain crap! Today we have Lightroom and Photoshop and the opportunities to "fix" an image during post-capture processing are almost limitless.
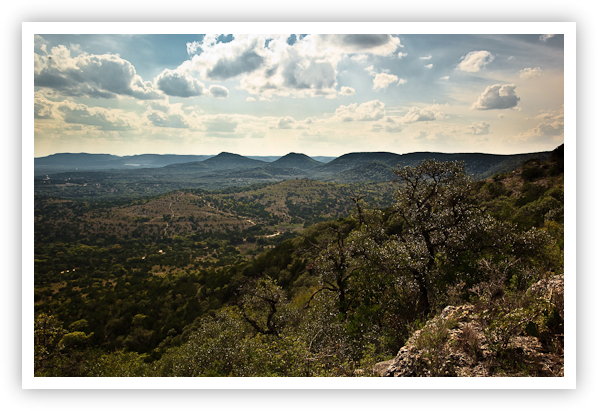
Flag Mountain View near Bandera, Texas
Copyright 2009 Jeff Lynch Photography
Shot taken with a Canon EOS 5D Mark II set on aperture priority (Av) using an EF 24-105mm f/4L IS USM lens hand held. The exposure was taken at 32mm, f/11 for 1/50th of a second using a Singh-Ray LB Warming Polarizer at ISO 100 on Lexar Professional digital film. Post capture processing was done in Adobe Lightroom 2. Click on the image above for a larger version.
Take this image for example. I shot this a few weeks ago while hiking in central Texas. The light was pretty poor in the late afternoon sun and I hadn't brought a graduated ND filter with me as I usually do. All I had was a circular polarizer to help cut down the haze and harsh reflections off the leaves. The scene was really breathtaking and I was disappointed that I hadn't brought the right gear to capture it properly.
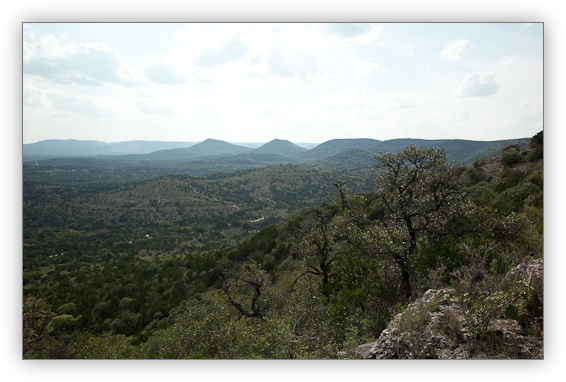
Original RAW Image
Rather than give up I setup my tripod and adjusted the Singh-Ray LB Warming Polarizer to provide the maximum amount of polarization. As you can see in the image above, it did help to reduce the glare but the difference in exposure values for the foreground and the sky was at least 3 stops. I took a few shots using the histogram on the camera's LCD to judge my exposure. I had no "blinkies" (blown highlights) so I new I had an exposure I could work with.
My first step in developing this RAW image was to process it as I would normally do in Lightroom. I generally work on the Basic settings like Exposure, Recovery (very important), Blacks (also very important), Brightness and overall Contrast. I almost always crank up the Clarity (adding mid-tone contrast) and Vibrance (adding mid-tone saturation) and may play with these two settings for 20 or 30 minutes until I find a combination I like.
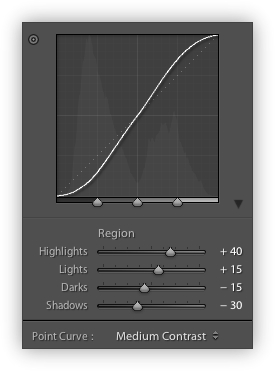
Tone Curve Adjustments
My next step was to work with the Tone Curve to adjust the Highlights and Shadows, and the Lights and Darks in the image adding much needed contrast and separation to these areas.
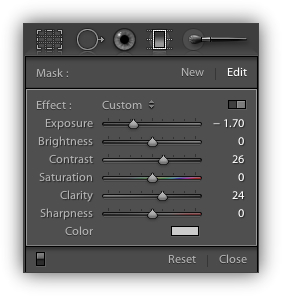
Using Lightroom's Gradient Tool
My final step was to use Lightroom's Gradient tool to simulate the effect of using a 2-stop graduated neutral density filter as shown above. While this tool is not nearly as effective as using a real ND-Grad in the field, it does offer very granular control over other characteristics in the gradient such as Exposure, Contrast and Clarity.

Using the Gradient Tool as a Graduated Neutral Density Filter
All in all, this image took about 45 minutes to "develop" in Lightroom and while the results are acceptable considering the original image, the amount of time spent working on this was considerable. If I'd used a graduated neutral density filter during the original exposure my post capture workflow would have taken only a few minutes and I really believe the results would have been much better.
In my opinion, making the exposure "in camera" is what photography is all about! Think of it this way; have you ever been out in the field photographing nature and thought to yourself, "I sure wish I was back home working on my images in Lightroom rather than out here with my camera"? Me neither!
Posted in Photography Tagged: Canon, Canon 5D Mark II, Hill Country State Natural Area, Landscape Photography, Photography, Texas Landscapes

![]()
No comments:
Post a Comment